
Links and Page Breaks make it easier for visitors to navigate your website. A well organized navigational system can also increase your Search Engine page rankings. This section has step by step instructions for dividing and connecting pages using the Joomla Page Break function and the JCE Editor Linking function. Linking is one of the primary methods used on the internet to convey and share information. Menus are simply a series of organized links to related pages with the menu items being the actual links. In this article, we will review several additional linking methods including READ MORE, PAGE BREAK, INTRO IMAGE AND TEXT, and adding internal or external links to text and/or images in articles and/or modules.
Divide an Article by Inserting a Read More Link
Joomla offers two ways to break up longer posts into shorter posts. These are the READ MORE and PAGE BREAK icons at the bottom of the Article Edit screen. The READ MORE icon is used for articles placed in a category blog page (including your Home Page Featured articles blog). There is typically a thumbnail image and a couple of introductory sentences. Then you have the option of placing a READ MORE link which the viewer can click on to go to a page which has the full version of the article. To insert a READ MORE link in a category blog article, go to the Article Manager and open the article for editing. Make sure the first couple of sentences provide an interesting summary of the article. Then place the cursor at the end of this introductory text and click on the READ MORE button at the bottom of the work screen:

A line is then inserted into the article. Save the article and then view the site to make sure the Read More link is displayed properly and takes you to the intended page.
TIP: The "read more" function works only in articles published in blog layout. By default, the Home Page Menu Item is a special Category Blog called Featured Articles. To create a Category Blog on another page, first create a new category for the new blog with your Category Manager. Then go to the Menu Item Manager for your Main Menu and create a New Menu Item. Then for Menu Item Type, select Category Blog. Then link this category blog menu item to your new category. For example, below we have created a category called Latest News with the Category Manager. Then we added a Menu Item called LATEST NEWS:
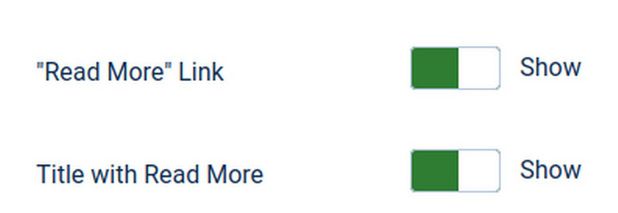
Add the Article Title to the READ MORE text
When you create a Joomla article for the front page or blog view and use the Read More option to split the article into two sections you will find the Read More link includes just the text "Read More" rather than the title of your article. To help search engines understand what the article is about plus improve the click through rate from both search engines and visitors, we recommend you change the read more link so it matches the title of your article. For example, if you have created an article titled "Benefits of Joomla for Business Websites" then the read more link would be "Read More Benefits of Joomla for Business Websites."

To add the article title to all of your Read More links, go to Content Articles and click on the Options button in the upper right corner. Scroll down the options to Read More link and click on the box, Title with Read More.
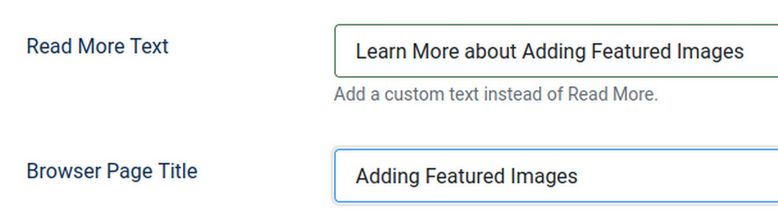
Then click Save and Close. You can use different button names for different articles. Go to the Article Edit screen and click the Options tab. Then scroll to the bottom and change the Read More text and browser page title to whatever you want:
Pagination: Divide Pages by Inserting a Page Break
It is sometimes useful to split a long article into shorter sections so the reader does not have to scroll down the page just to reach a particular section in the article. Using a Page Break also creates a table of contents for your long article, with the page tab entries being the Page Titles that you enter for each page. You have to decide how long each page will be. But the table of contents includes an option to view the whole article, so a reader is not restricted to viewing your article one page at the time. In addition to displaying the Table of Contents, each page will show a Previous and Next navigation button at the bottom of the page.
Articles which have many pages and many clear dividing points are ideal candidates for inserting page breaks. For example, our Article 5.2 How to Write and Post Articles is over ten pages long and has an introduction section followed by 8 steps. Here are the eight steps:
1 Create a new Writer document.
2 Add Images to your Article
3 Create a copy of your Article and add image placeholder text.
4 Move images to an Article Images folder.
5 Create a matching Images folder with the Joomla Media Manager
6 Create Matching Categories with your Joomla Category Manager.
7 Create a new article with the Joomla Article Manager.
8 Delete Image Placeholder Text and Re-insert Images.
We will break this up with 8 page breaks. To insert a page break, go to the Article Manager and open up our long article.
Then position the cursor where you want the first page to end and the first page break to go.
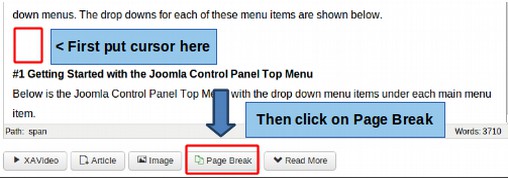
At the bottom of the Editor screen, click on the Page Break button. This brings up the Page Break screen:
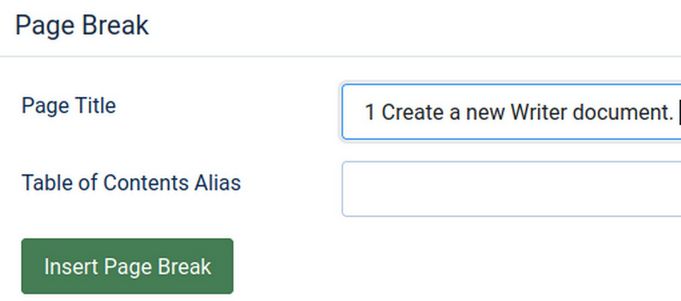
Give the New Page a Title, then click Insert Page Break. The second field called "Table of Contents Alias" will be the URL for this second page and will be automatically entered by Joomla. This will insert a line into the text indicating a page break has been inserted.
TIP: If you do not insert a title, Joomla will simply list page numbers which will not be very useful either for viewers or search engines, so it is recommended that you take the time to give each new page a short title based on the primary subject of that new page.
Add More Page Breaks
Keep placing your cursor where you want the next page break to go. Then click "Page Break" and typing in titles until you have split this article as many times as you wish. Each time you click “Page Break”, you should see a gray line across the page. When you're finished, click Save and Close. Then visit the front end of your website and click on the article in the menu to open it.
Visit the Article with Page Breaks to see the new Article Index:
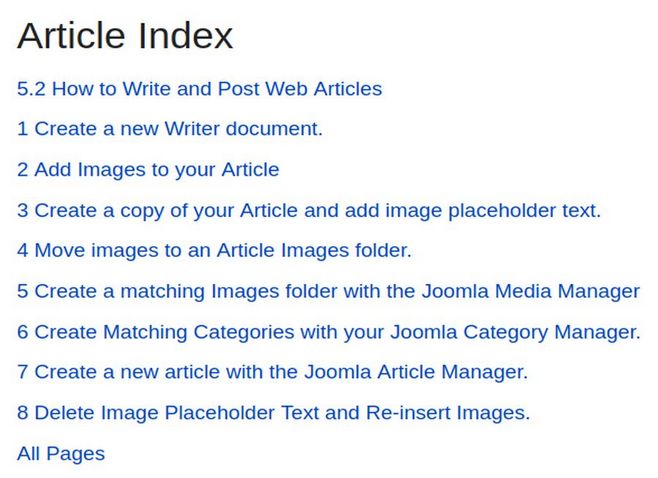
When you visit the article you will see two special items, an "Article Index" which serves as a table of contents to the article pages and Prev and Next buttons at the bottom of the article for viewers to move on to the next page
Set the Page Break Display Options
There are some additional display options. Go to Extensions - Plugin Manager – Content – Page break. Below are Basic Display options:
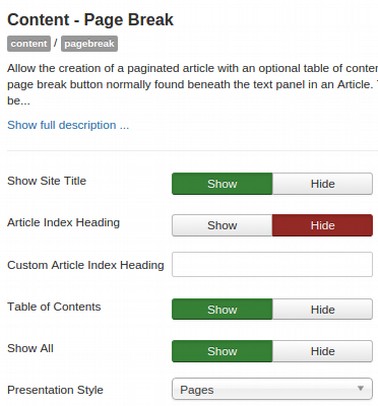
Show Site Title includes some of the article information in the page title. It is best to set Show Title to Show.
Article Index Heading Setting this to Hide will hide the title that says "Article Index" by default. You can set it for Hide in order to save space..
Custom Article Index Heading means that you can change the text of the "Article Index" heading to anything you want. For example, you could change this to Article Table of Contents. Leaving this blank will display Article Index.
Table of Contents generates the list of links in the article, the Article Index, on the page. Setting this to Hide would eliminate that list. So leave this set for Show.
Show All controls whether the link to show the full article without page breaks is available in the Article Index. Leave this set for Show as some viewers prefer to see the entire article and scroll down rather than clicking on a series of pages.
WARNING: It is not possible to edit page break titles once they have been made. To change this information, you have to delete the page breaks by deleting the inserted lines and start over.
Use Intro Text and Intro Images in a Blog Post
This optional feature for blog category articles allows you to have different text in the blog category view from the text that is displayed when you view the full item. The default content shows you the intro text in the blog category view and when you click the read more button you get the intro text and the full text. In some instances you may want to have a different image or text on the full article main page than the intro image and text that appears on the blog page. You can do this by setting the introtext to NO in the menu settings for the blog category settings.
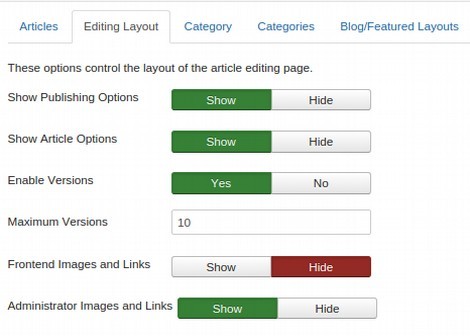
Set Article Options to Display Image and Links Section
To set the Intro Text and Intro Images feature to display, go to the Article Manager and click on OPTIONS in the upper right corner. Click on the Editing Layout tab, then make sure Administrator Images and Links is set for Yes.
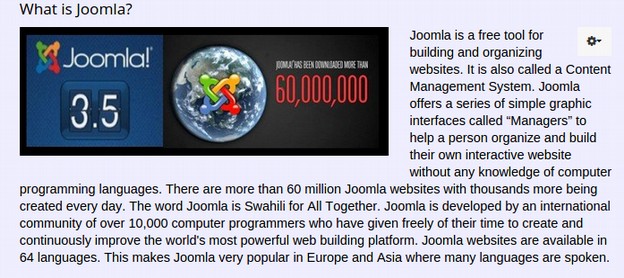
Also we must create a new blog category and a new blog menu item like we showed above for adding a READ MORE button if we want to use the Intro Text and Intro Images function on a page which is not already set in a category blog – or is not on the Home Page Featured Articles. To create your Intro Text and Intro Image, open a new or existing article which is set for our category blog category or featured articles. We will use a new article for our Home page called What is Joomla? To place this article on the HOME page, just changed Featured from No to Yes.
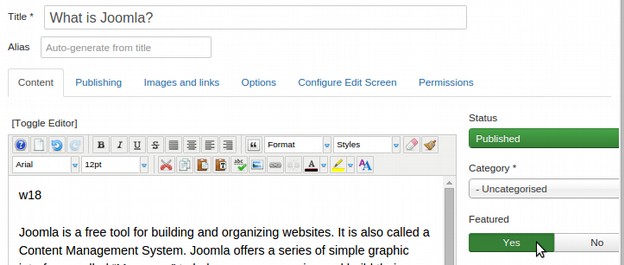
Above the article editor is a tab called Image and Links: Click on it.
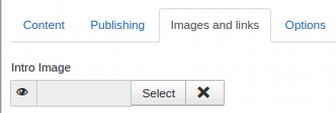
Clicking on the Select button brings up the images manager where we can add an image from any folder. Usually, thumbnail images for articles are kept in a special folder called thumbnails. Thumbnails are smaller images used at the beginning of blog articles. If you want thumbnail images automatically made for you, by reducing regular article images then go to the Joomla Extension Directory. There are several free extensions which will do this. You can also add a caption and alternate text to display in only the blog Introduction. Then click SAVE and Close and View the article to see the result.
Use Internal and External Links
An internal link is a link from one article to another article on your website. To add an internal link to an article, go to the Article Manager and open the article to the Article Edit screen. Then select the text or image you want to create a link for.
Click on the Link Icon in the JCE Editor:

This will bring up the LINKS screen:
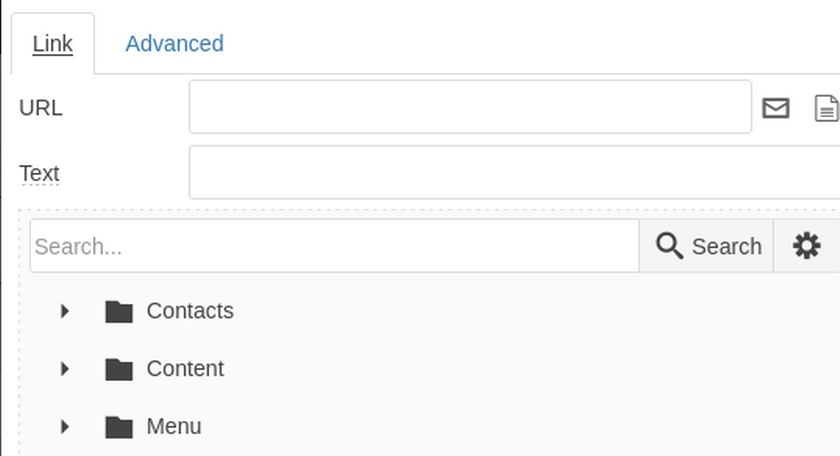
You have three options to establish a link to this page. If you know the name of the Joomla article, click on Content and find the Article. If you do not know the name of the article, but you know the name of the Joomla menu item, you can click on Menu. Finally, if you know the URL of the article, you can enter that in the URL box. We will click on the Content option:
Once the URL is in the URL box, click on insert:
Then click SAVE. Then View Site to check on the link to make sure it actually works. Then click SAVE and CLOSE. Linking to an image works exactly the same way.
Create a Link to a PDF file in a Joomla Article
Joomla treats PDFs as if they were large images. So you add PDFs to the Media Manager just like you add images to the media manager. First, you create a folder to put the PDFs in (named pdf). Then you upload and organize your PDFs in this folder using the Upload tool in the Media Manager. Then create a new article or open an existing article and place your cursor where you want the PDF to be inserted. Then click the Media button at the bottom of the page. Open the PDF folder and click on the PDF icon to select it.
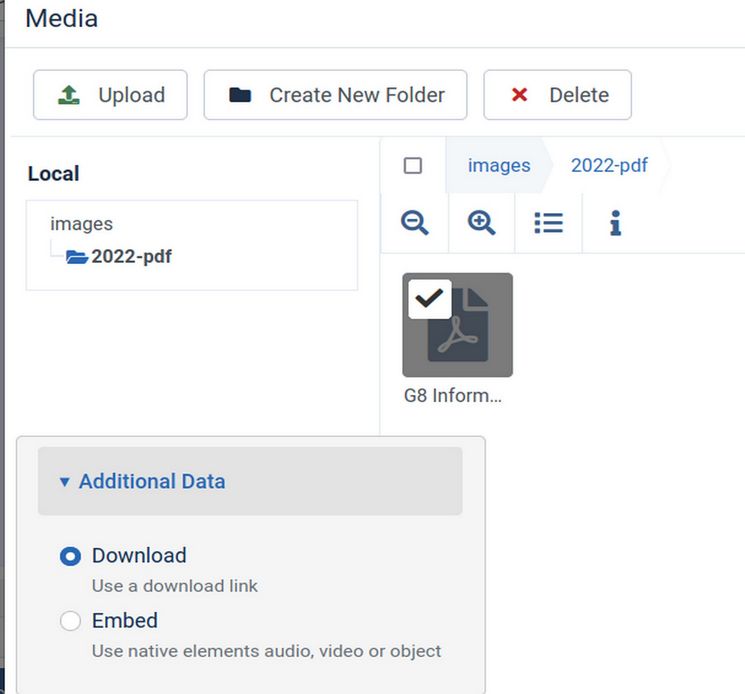
The default is to choose a download link which will download the PDF. It is better to change this to an Embed link to embed the PDF into the article where your viewers can read the article if they wish before downloading it. You can then change the width and height of the display box which by default is 800 pixels wide by 600 pixels high. Then click Insert Media. Then click Save. Then click Preview to view the embedded PDF:
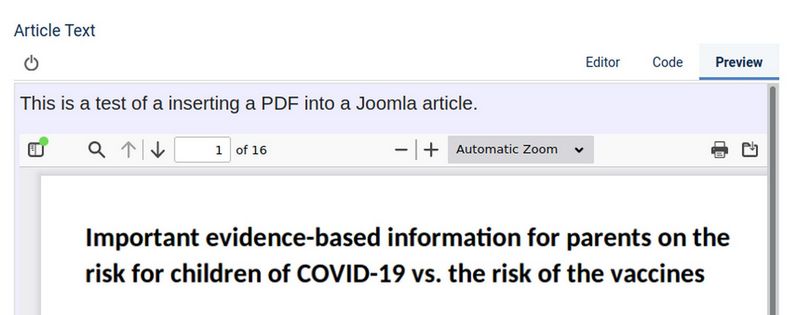
There are Print and Download buttons in the upper right corner.
Create a Link to a PDF file in a Joomla Article
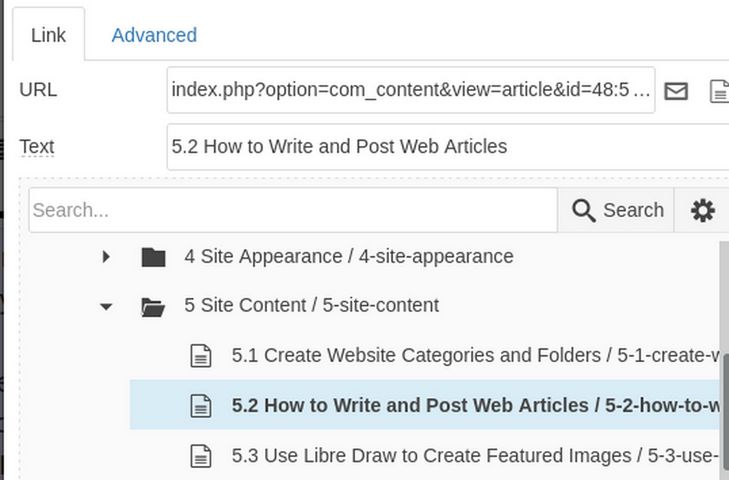
You can also add a link to a PDF the same way you add a link to any other text or image. First you type in the name of the PDF and make the text bold. Then select the text that you want to add the link to. Then click on the LINK icon in the JCE Editor. The Link Manager will open a window. Click the far right icon in the URL line (Browse).
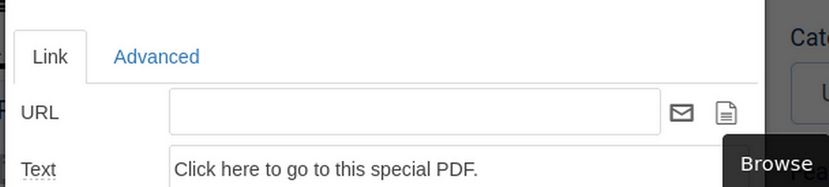
This will open the Joomla Media Manager where you can open your PDF folder and select a PDF that has already been uploaded to the Media Manager. After selecting the PDF, click the INSERT icon. This will not only activate the link to the PDF, but allow the PDF to be previewed and downloaded. Then click Save and Close. The PDF can now be downloaded by going to the article and clicking on it.
TIP: The problem with this simple method of linking a PDF to an article is that you do not get a count of how many times the PDF was downloaded. We will therefore use a different component called Phoca Download to organize our PDFs into categories and keep track of how many times each PDF is downloaded.
What's Next?
We will next review how to create custom feature boxes that Joomla calls custom modules.