
Setting up website categories to place articles, images and menu items in is important in order to avoid having your website turn into a mess over time. While categories can be added later, attempting to change the location of articles and images will likely result in broken links. This is why setting up your website categories should be done before writing articles and adding images.
Plan Ahead... Organize your Categories to allow for Future Growth
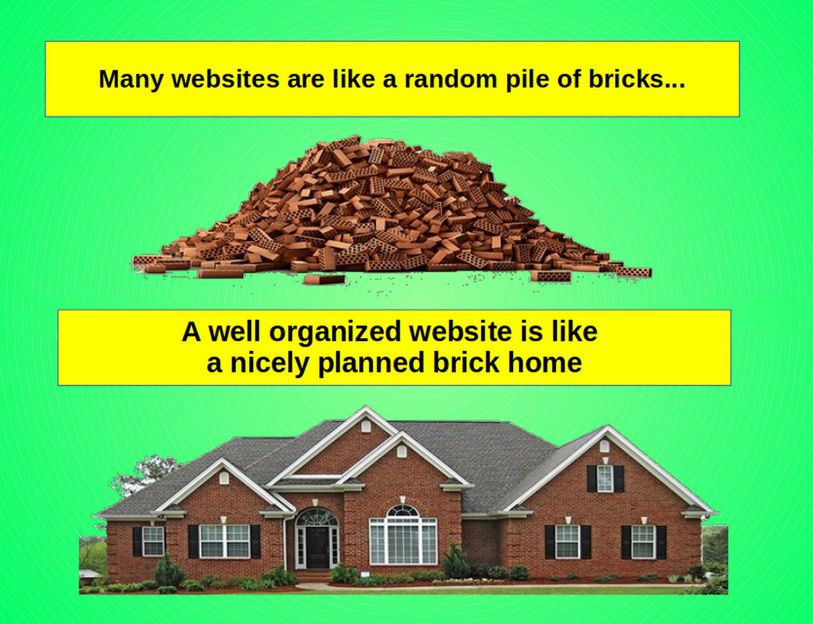
The first step is to consider the entire layout of your website – not merely what it will look like now, but what it might look like in the future. Building your website is like building a home. You may want to start with a simple one story, one room house. But most folks add extra rooms onto their homes over time. You want to plan ahead by designing and building a solid foundation so that you do not need to tear down your entire home when it comes time to add that extra bedroom. First you create the structure or the plan for your new house. Then you create the webpages and put them all in like building blocks in the proper place in the house.
Your website categories are also like the chapters of a book. Your website should be more than just a random collection of pages and links to navigate between pages. It should be organized like the Table of Contents in a book, describing the layout of the book and the logical flow from one page to the next by organizing the page subjects into chapters (which Joomla called categories).
There are several reasons to organize your website main menu like the Table of Contents in a book. The first is that your website viewers have been reading books and magazines and newspapers all their life. They are used to seeing a Table of Contents and having the content organized into Chapters and Pages (or in the case of a Newspaper, Sections and Pages and Articles). The Main Menu should be a Table of Contents which your viewer can quickly scan through in order to understand the organization of your website and where they might be able to find a particular page or article they are interested in reading. Another important reason is conservation of space. Unlike a book, the Main Menu will and should appear on every page to help the viewer with Site Navigation.
Translating Book Names to Website Names
Imagine you are writing a 400 page book. Your 400 page book might have 10 chapters each with 40 pages. You can further divide these 40 pages into 4 sections each with 10 pages. This is exactly the structure we are using on this website, namely 10 categories (actually 9 categories and a Welcome article) - each with 4 sections or articles per category. Each section is a single page or link on the website. But each section is typically about 10 pages of text and images which is read by scrolling down the web page. Using our book analogy, the Joomla name for pages in the book is Articles, the Joomla name for Chapters in the book is Categories and the Joomla name for Table of Contents is the Main Menu:
Book Name >>> Joomla Name
Pages >>> Articles
Chapters >>> Categories
Table of Contents >>> Main Menu
There is an unfortunate tendency to head straight to the Menu Manager to try to create your menu. But the first thing to know about Menus is that they are creating links to actual pages. You first need to write some pages before you use the Menu Manager to create your links. This leads to the second unfortunate tendency which is to start writing articles. This leads to a poorly organized website. To use the house building analogy, you should not start building a house by constructing a bunch of rooms and hoping they will fit together. Instead, you first need to design a PLAN for the House and write this plan down on paper. In Joomla, there are two levels to this plan. The first level is the CATEGORIES. And the second level includes the actual ARTICLES. So you begin your house plan (or your book) by defining some categories. We will do this next.
Create Your Website Category Structure
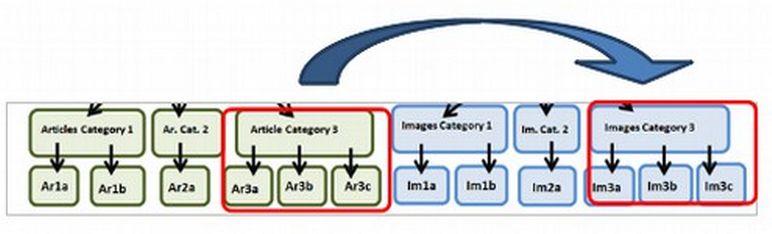
One of the many purposes of a Joomla website is to help you organize the structure of your pages. This is why Joomla is called a Content Management System (CMS). With all Joomla websites, Web pages are called Articles, which are organized into Categories. Articles are placed inside of categories. Here is an example of a simple structure for a basic website:
Simple Example: Categories and Articles for a Basic Website
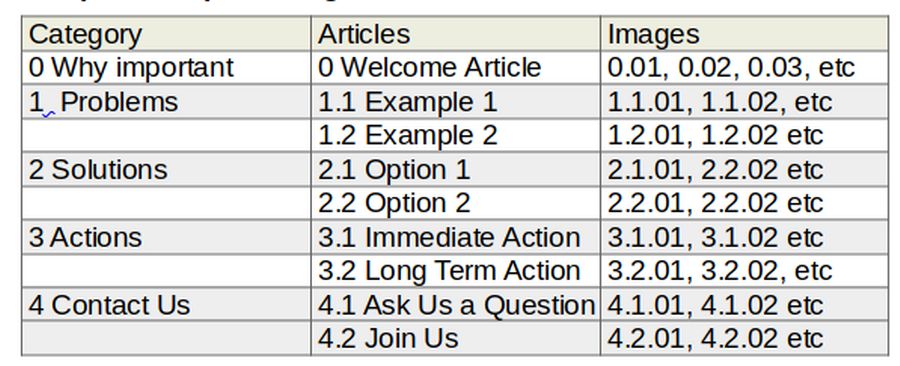
Each category can have more than one article. Each article can have more than one image. Image numbers should provide the order they appear in articles as well as the article they are in and the category they are in. For example, image 3.2.02 is the second image in the second article in the third category.
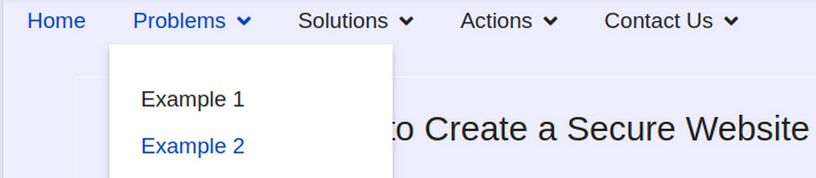
After you create a Main Menu which matches the Content Structure above, the Main Menu for your website would then look like the following:
Home Page (Why Topic Important)
Problems
Example 1
Example 2
Solutions
Option 1
Option 2
Actions
Action 1
Action 2
Contact Us
Ask Us a Question
Join Us
Each Category link on the Main Menu above leads to a sub-menu with the articles. For example, the sub-menu for the category Possible Solutions would include links to two articles, Option 1 and Option 2. Sub-menus can also be displayed in Joomla as hidden “drop down” menu items. Here is what this menu looks like with the Helix normal two level menu:
Complex Example: createasecurewebsite.com
Each of our courses at College in the Clouds has about 400 pages of content with 400 images divided into nine categories plus a Welcome folder and a Welcome article for the Home page. There are 4 Articles in each of our 9 categories for a total of 36 10 page articles. This is a lot of content.
Break Down Complex Topics into Simpler Topics
A basic principle of education is to divide complex tasks into a series of simpler tasks. This is also true of presenting content of any complex website. Thankfully, the Helix Template comes with a very easy Mega Menu creation tool to help us. First, we will divide the course and website into three parts:
First Steps, More Steps and Final Steps.
These three parts will become our Top Level Menu items. Second, we divide each part into three categories (or chapters).
Part I First Steps
1 Use a Linux Computer
2 Create a Secure VPS
3 Site Set Up
Part II More Steps
4 Site Appearance
5 Site Content
6 Site Navigation
Part III Final Steps
7 Create Custom Modules
8 Site Promotion
9 Site Management
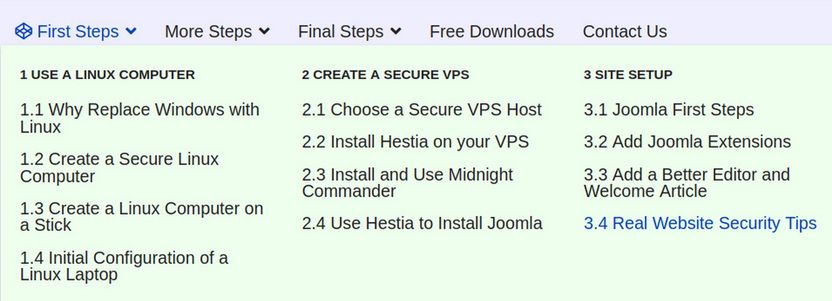
These 9 Categories or Chapters will become our Second Level Menu Items. Then each Chapter will be divided into four sections or articles. Each article will be about 10 pages with 5 pages of text and 5 pages of images. Thus, our Table of Contents looks like the following:
Website: Create a Secure Website (9 categories) (37 Articles)
Category 0 Home Page only (in the matching book, the Welcome article is the Preface).
0.1 Welcome to Create a Secure Website!
PART I FIRST STEPS
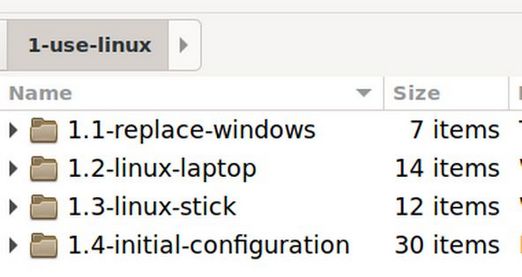
Category 1 Use a Linux Computer
1.1 Why Replace Windows with Linux
1.2 Create a Secure Linux Computer
1.3 Create a Linux Computer on a Stick
1.4 Initial Configuration of a Linux Laptop
Category 2 Create a Secure VPS
2.1 Choose a Secure VPS Host
2.2 Install Hestia on your VPS
2.3 Install and Use Midnight Commander
2.4 Use Hestia to Install Joomla
Category #3 Site Setup
3.1 Joomla First Steps
3.2 Add Joomla Extensions
3.3 Add a Better Editor and Welcome Article
3.4 Real Website Security Tips
PART II MORE STEPS
Category 4 Site Appearance
4.1 Helix Template First Steps
4.2 Helix Template Next Steps
4.3 Create a Helix Menu and Mega Menu
4.4 Customize your Website Typography
Category 5 Site Content
5.1 Create Your Website Category Folders
5.2 Write Articles as Libre Writer Documents
5.3 Use Libre Draw to Create Article Images
5.4 Add a Featured Image to a Joomla Article
Category 6 Site Navigation
6.1 How to create Menu Item Links
6.2 Create Category and Article Menu Items
6.3 Divide and Links your Web Pages
6.4 Create a Module Based Menu Page
PART III FINAL STEPS
Category 7 Create Custom Modules
7.1 Style Custom Modules with Basic CSS
7.2 Use Preset Classes to Style Custom Modules
7.3 Create Complete Module Classes
7.4 Use Rainbow Presets to Style Feature Boxes
Category 8 Site Promotion
8.1 Create a Front Page Slide Show
8.2 Place a Slide Show in an Article
8.3 Insert a Video in an Article or Module
8.4 Create Videos and Video Channels
Category 9 Site Management
9.1 Add a Downloads Manager
9.2 Search Engine Optimization
9.3 Add a Broken Link Redirect Tool
9.4 Add a Site Map & Next Steps
Each Part will be shown on the Top Main Menu:

Each Part will have its own Mega Menu drop down with each drop down having three categories and each category with four articles:
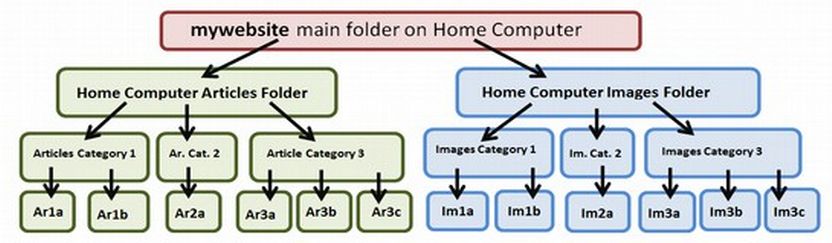
We will first use our categories to create folders for articles and images on our home computer. We will then use those same categories to create folders for our articles and images with our website’s Category Manager and Media Manager. Finally, we will use the same categories to create Menu items in our Main Menu. Below is what the folder structure will look like on your Home computer.
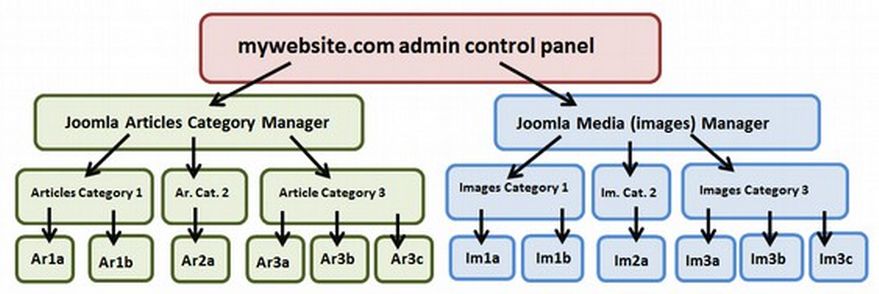
We will create an identical folder structure on for the articles and images on our website administrator control panel using the Joomla Category Manager and Joomla Media Manager:
What your Folder Structure will look like when you are done
8 Steps for Creating your Folder & File Structure
We will begin with a brief overview of the entire process of creating articles and web pages. Before we write articles, we need to set up the categories to put the articles in. This section describes 8 steps for creating the folder and file structure of our website on our Home computer. In the next article, we will describe a similar process for creating an identical folder and file structure on our website. In other words, we actually build our website on our Home computer first. And then copy this structure to our Joomla website later.
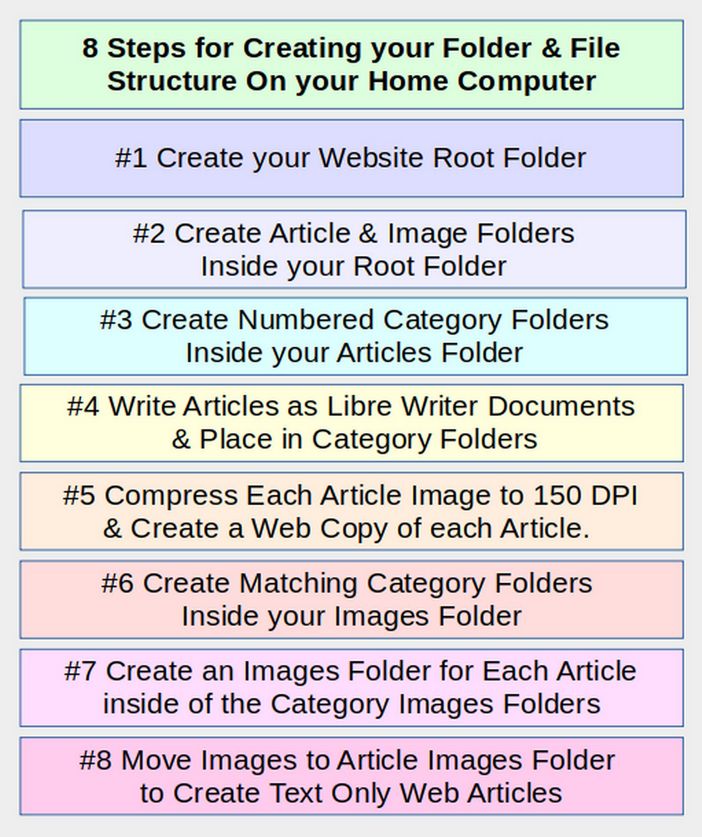
Let’s take a closer look at each of these 8 steps.
#1 Create your Website Root Folder
Open your Home Computer File Manager and right click on the screen.
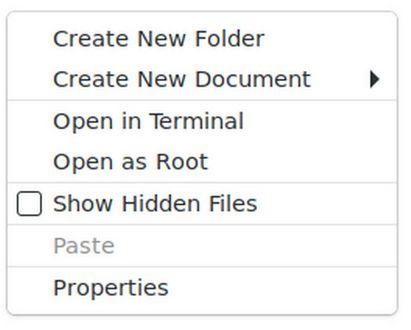
Click Create New Folder. This will create a folder called Untitled Folder near the bottom of your list of folders. Right click on this folder and click Rename to rename it as the domain name of your website. We will name our Root Folder Create a Secure Website
#2 Create Article Images and Extensions Folders
Click on your website root folder to open it. Then right click on the screen and click Create New Folder. Rename the first folder Articles. Then right click on the screen again and rename the second folder images. Then create a third folder named Extensions. This is the initial folder structure you should create on your home computer for every website you make:
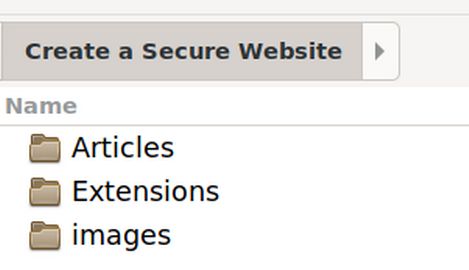
The Articles folder name can include capital letters and spaces. But the images folder and sub folders and file names should all be lower case letters only with no spaces. Instead, use dashes to separate words in your images folder, sub folders and files.
We will use the extensions folder to keep all of our add on extensions. The other two folders, articles and images will be used to organize our website content on our home computer.
The first folder is called Articles and should contain all of the articles which will eventually be posted in your article manager. These articles should be assigned to category folders just as articles on your website are assigned to categories.
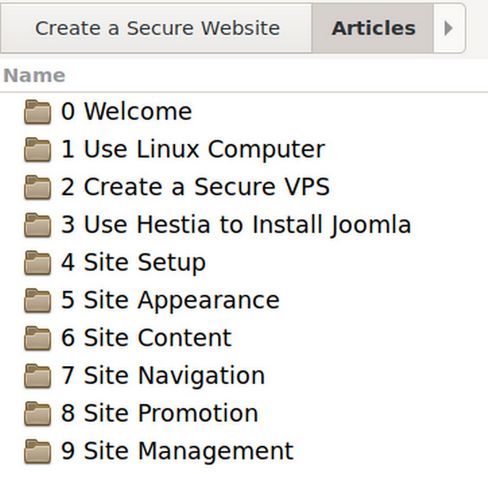
#3 Create Numbered Category Folders inside of your Articles Folder
Click on your articles folder to open it. Then right click and create a new folder for each of your website categories.
Numbering your category folders will help keep the categories in the correct order in a manner similar to a Table of Contents. When you are done, the inside of your articles folder should look like this:
The articles folders do not need to be lower case. This is because the Joomla Category Manager allows for folder names to have capital letters and spaces. This is also a good way to tell your Articles folders from your images folders (which have the same names but are lower case with no spaces).
Note that there is an extra category for articles such, as the Welcome article, which only appears on the Home Page. On the server, you would leave them as Uncategorized. In other words, the 00 Welcome folder on your HOME computer equals the Uncategorized folder in the back end of your website. The key thing to understand is that the category folders on your HOME computer should match the categories in the Joomla Category Manager.
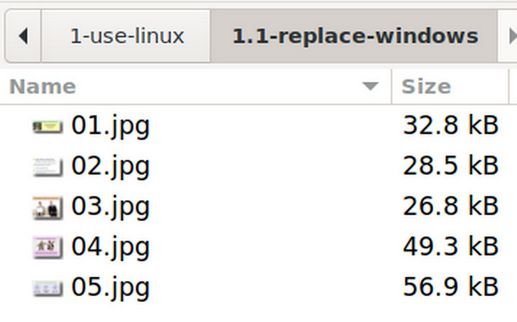
There will eventually be four articles inside of each of these Category or Chapter folders. But as we will explain further below, there are always two versions of each article, the original version with images and a web or text only version in which the images have been removed. These articles are also numbered to keep them in the right order. Below are the 8 articles in the 01 Use a Linux Computer Category folder.
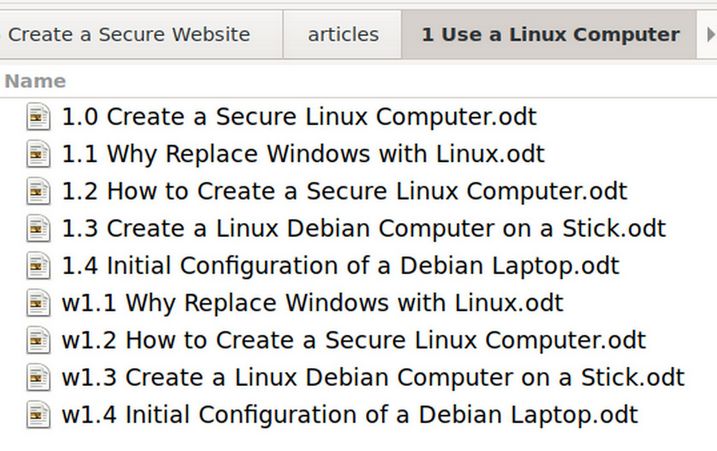
Note that there are TWO versions of each article. The first is the actual article as created in a document with the images in the articles. Because only TEXT can be entered with your website’s text editor, images cannot be transferred directly into your web articles. It is therefore essential that you create a second text only article with the images removed and replaced by placeholder text indicated which images go where in the article. We will review how this is done in a later article. The images for the WEB version of each article are copied into folders created for each article and placed in the images folder as shown below.
Step 3: Create Category folders for your images on your home computer
In addition to using our categories to create folders to place articles on our home computer, it is also important to create identical category folders for the images on our home computer. You can imagine that if you have 36 web pages (in other words 9 chapters each with 4 articles) and 10 images per page or article, it is extremely important to keep these 360 images organized on your home computer and on your website back end.
Opening up the images folder reveals the same category folder structure used for articles. Note that all images folder names (and all images) use lower case letters with no spaces. Here is what they look like in my home computer images folder:
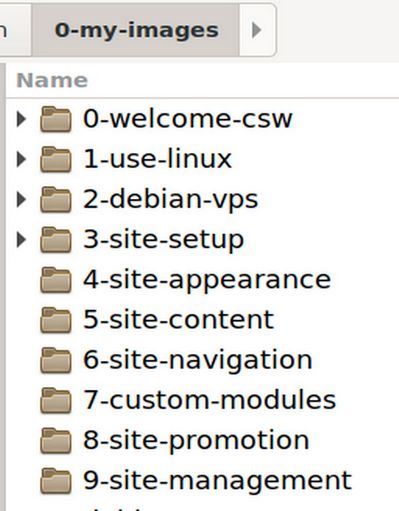
The images folder category names on our home computer are the same as the article category names on our home computer:

Then if you open up any of these image category folders, you will see four folders for each of the 4 articles in that category.
Each of these images folders will only have images for a single article. Below are the 4 images folder inside of the first category of our course book and website:
These four images folders hold the images which will later be transferred to the images folder on your server.
The folder names are short as these will eventually be used as part of the file pathway for our images on the server and we do not want long names in the file pathways. We know they are images folders because their folder names are lower case with no spaces. Each article gets its own images folder. If you have three articles in a given category, you should have three images folders for that same category:
When you open up any of the images folders, you will see all of the images that were removed from the WEB version of the article. These images are listed in numerical order to help re-insert them in the proper order AFTER the WEB or TEXT ONLY version of the article has been copied and pasted into the article by your text editor. Here are the first five images from our first article in our first category:
We will soon set up this same image folder structure in the Joomla Media Manager. But first we have to write our web articles.
What’s Next?
In our next article, we will review how to use Libre Writer to write your web articles.