
In a previous article, we explained how to insert images into a Joomla article using the JCE Images Manager. This is your best option if your goal is to create documents such as PDF documents or Ebooks as the images are inside of all versions of your article. However, Joomla offers another way to insert special images that are “associated with” rather than being inside of a Joomla article. Joomla calls these special images, “Featured” images. There are Intro Featured Images and Full Article Featured images. In this article, we will review how to add both types of featured images to a Joomla article.
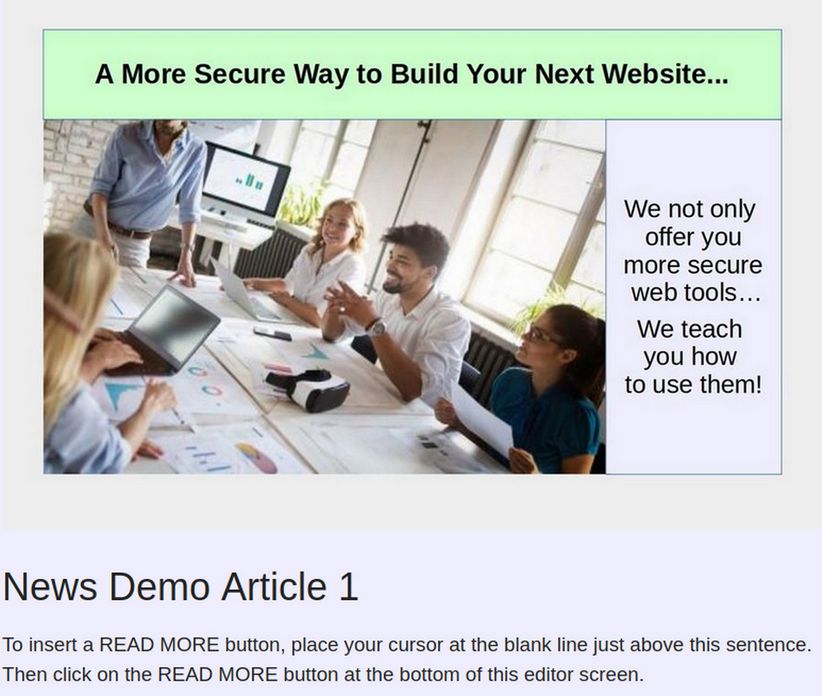
To better understand what we are trying to accomplish in this article, here is what Full Article Featured Images look like in a Single Column Full Text article screen:
Here is what the Intro Featured Images with Large Thumbnail Images look like in a two column Blog Layout:
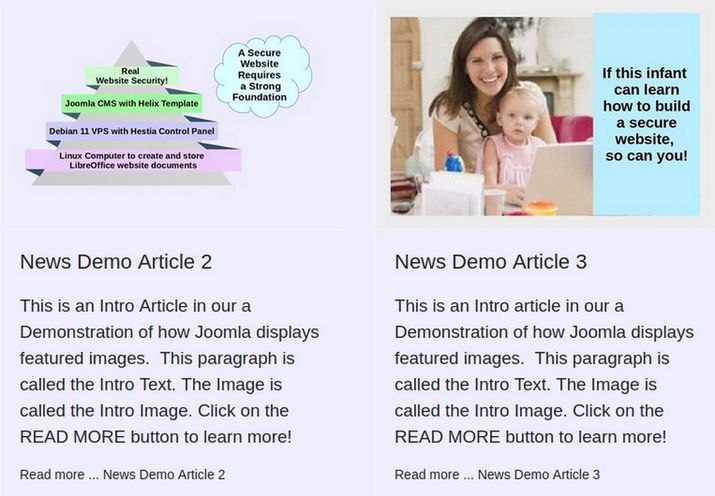
Click on the image, title or Read More text to go to the Full article. Here is what Intro Featured images with Small Thumbnail Images look like in a 3 column Blog Layout:

Let’s look at the steps for adding featured images to articles.
Create your Featured Images
It is important that the featured images for all articles all be the same width and height. As we explained in the last article, the best width for the full article image is 900 pixels by 600 pixels high. We also need to create a Large Thumbnail Image that is 450 pixels by 300 pixels and a small thumbnail image that is 300 pixels by 200 pixels – a process we covered at the end of our last article.
Create a New Blog Category and Menu Item
Joomla intends for featured images to be associated with Featured articles that display on the Home page of our website. Joomla assumes we will have several articles on our Home page. However, because I view the Home page as being the same as the Preface of a book, I take up the entire Home page with the Welcome article.
Therefore, to demonstrate how Featured images work, we will create a new blog category called News. We will then create a Menu Item for our News Blog. We will then create several Demo blog articles to help us see how these Featured Images display – both in the Blog View Layout and the Full Article Layout.
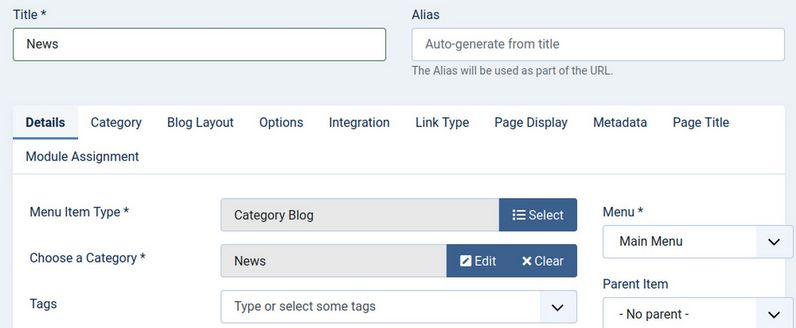
Log into your Dashboard and go to Content, Categories and click New. For Title, type News. For Description, copy paste:
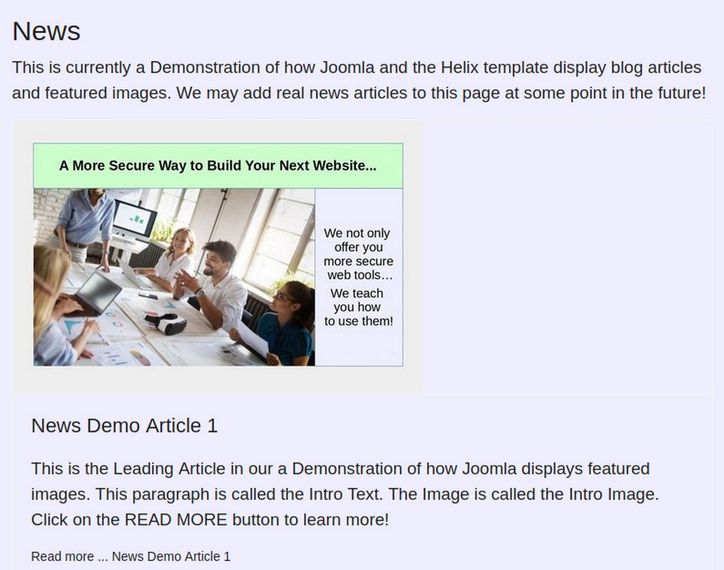
This is a Demonstration of how Joomla displays featured images. We may add real news articles to this page at some point in the future!
Select all of the text and change the font size to 14. Then click Save and Close. Then click Menus, Main Menu, New. Click Select Menu Item Type. Then click Articles, Category Blog. Then for Choose a Category, select the News category. For Title, type News.
Then click on the Category tab. Change Category Title and Category Description from Hide to Show. Then click the Blog Layout Tab. Leave Leading article at 1 and Intro articles to 2 and columns to 2. But scroll down to Featured articles and change it from Show to Hide. Change Multi Column Direction from Down to Across and Linked Intro Image from No to Yes.
Finally, click on Page Display and type News for Browser Page Title. Then click Save and Close. Then view the result on the front end:

There are no News articles yet. For an article to display on this page, it needs to be assigned to the News category.
Create our Demo Featured Images
A Joomla Featured Image can be any image that is loaded to any article on your website. Ideally, all Featured images should be the exact same height and width. Create full width, large thumbnail and small thumbnail images are we covered in our last article. Then save these featured images to a special images folder on our Home computer called featured-images. We then create a featured-images folder in our Joomla Images Manager and loaded them to a featured-images folder. This will make it easier to select them as we create our Demo News Blog articles.
Create our Leading Article
Go to Content Articles and click New. For Title, call it News Demo Article 1. For Text, copy and paste the following:
This is the Leading Article in our a Demonstration of how Joomla displays featured images. This paragraph is called the Intro Text. The Image is called the Intro Image. Click on the READ MORE button to learn more!
To insert a READ MORE button, place your cursor at the blank line just above this sentence. Then click on the READ MORE button at the bottom of this editor screen.
This is more content that is part of the Full Article but not visible on the Intro Article.
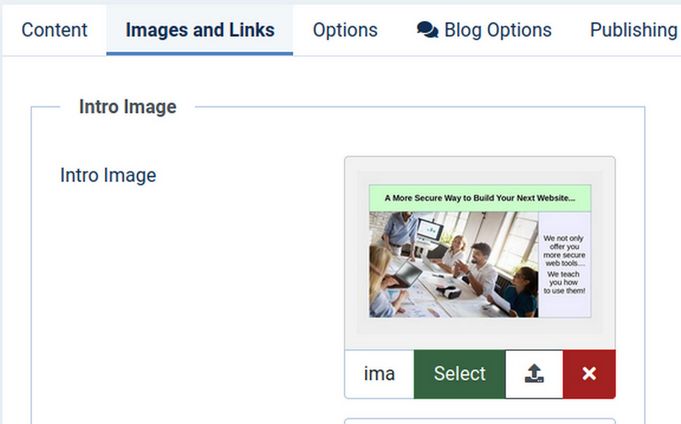
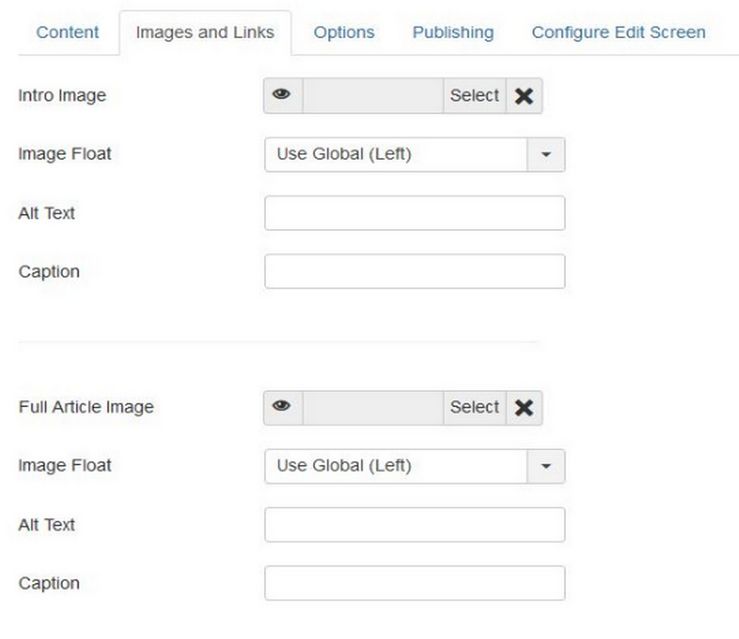
Add the Intro and Full Article Images
To add the Intro Image and Full Article Image, click on the Images and Links tab. Then click on the Select buttons and go to the Featured Images folder to select the Large Thumbnail and Full images we loaded into the Joomla Media Manager:
In addition to adding a READ MORE button, be sure to assign this demo article to the News category. Then click Save and Close.
View the Result on the Front End
The READ MORE button needs better styling. We will deal with that later. Even though the leading article is set for 1 column, it still just uses the large thumbnail image. To see the full image, we need to click on either the image, the title or the Read More button to get to the Full Article page – which we showed above at the beginning of this article.
Create the Second, Third and Fourth News Article
Go to Content Articles and click New. For Title, call it News Demo Article 2. For Text, copy and paste the following:
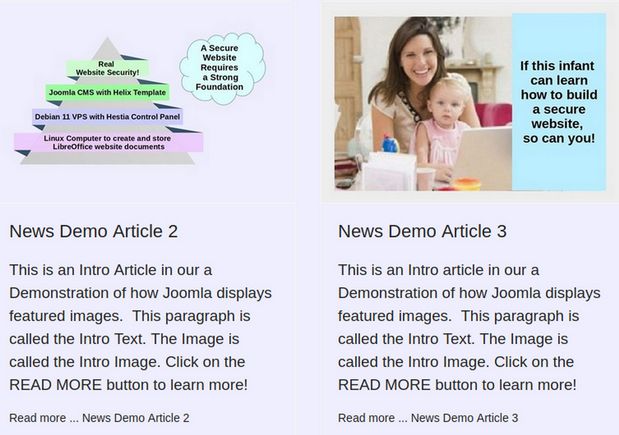
This is the Second Article in our a Demonstration of how Joomla displays featured images. This paragraph is called the Intro Text. The Image is called the Intro Image. Click on the READ MORE button to learn more!
To insert a READ MORE button, place your cursor at the blank line just above this sentence. Then click on the READ MORE button at the bottom of this editor screen. This is more content that is part of the Full Article but not visible on the Intro Article.
Add the Intro Image and Full Article Images. Then click Save and Close. Repeat to add the third and fourth demo news articles. Then view the result on the front end. Here are the two Intro articles displayed in a two column layout just below the lead article:
It is important that Intro articles only have a few words in the Intro Text before the Read More button. Even then, the vertical format of having the image above the Title simply takes up too much room. Joomla 3 included a way for us to float the image to the left of the Intro text as is shown in the Joomla 3 screen shot:
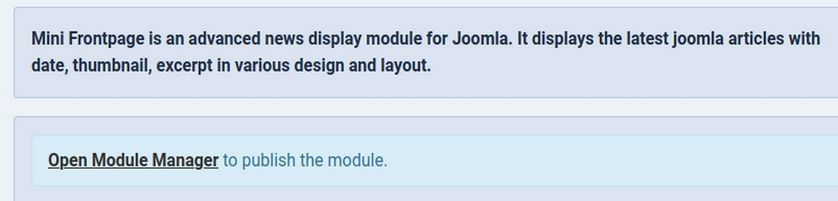
However, this feature is missing in Joomla 4. We could add a class to float the image left. But the featured images still go below the titles. To solve this problem and create a more space efficient way to display Intro Articles, we will need to add a free Joomla extension called Mini Front Page.
Download and Install Mini Front Page
Here is the link to Mini Front Page in the Joomla Extensions Directory.
https://extensions.joomla.org/extension/mini-frontpage/
Click Download to go to this page:
https://www.templateplazza.com/items/mini-frontpage-joomla-module
Click Download again. You will need to register. Then download this module. Then move it from your Downloads folder to your website Extensions folder. Then UNZIP the folder to reveal the Joomla 4 version of this extension. Then load the Joomla 4 version of this extension to your Joomla website with Systems, Install, Extensions. This popup will appear:
Create a new module position for Mini Front Page
Before we publish this module, we need to create a new module position to place the module in. Click Template, Styles. Then click on the Helix template to edit it. Then click on the Layout button. Click on the plus sign just below the word Component to add a new module row. Use the arrows to name this row News. Then click on the three dots to select the user1 module position.

Then click Save and close the template edit screen.
Configure the Mini Front Page Module
Click on Content, Site Modules to go to your Modules Table. Then click on the Mini Front Page module to configure it. Hide the Title and set the position to Helix user1. Then publish the module and set the articles to display to 8.
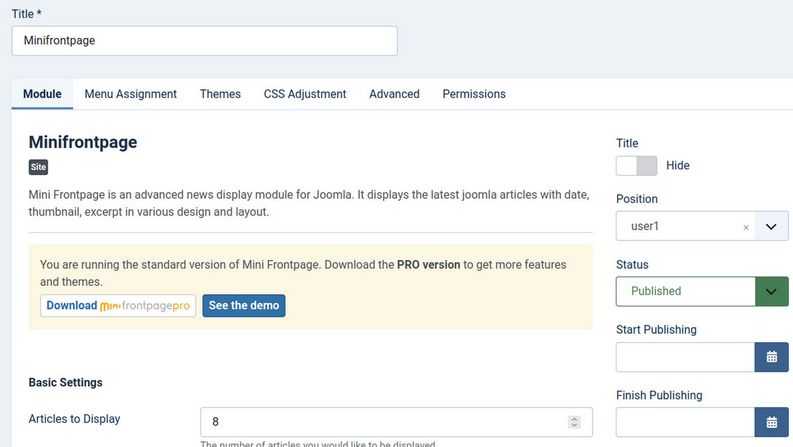
Scroll down the page and increase Intro text characters to 300. Then change the Category to News. Increase thumbnail width from 64 to 164 and height from 64 to 120.Then click on the Menu Assignment tab. Change it to Only on the Pages Selected. Click None. Then check the News menu item.
Then click the Themes tab and change the number of columns to 2. Hide the article date. Most important, change the Thumbnail position to Left of Title. Then click Save and Close.
Change the News Menu Item to Hide All Intro Articles
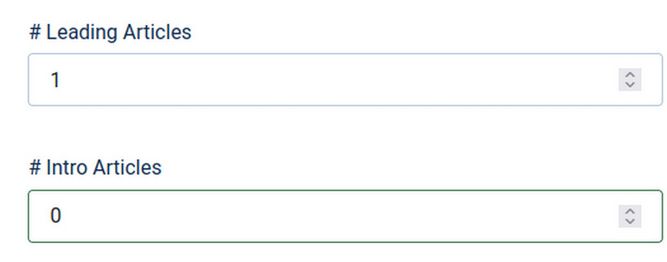
Click News, Main Menu. Then click on the News menu item to edit it. Then click on the Blog Layout tab and change Intro articles to 0:
Also hide the pagination. Then click Save and Close and View the result:
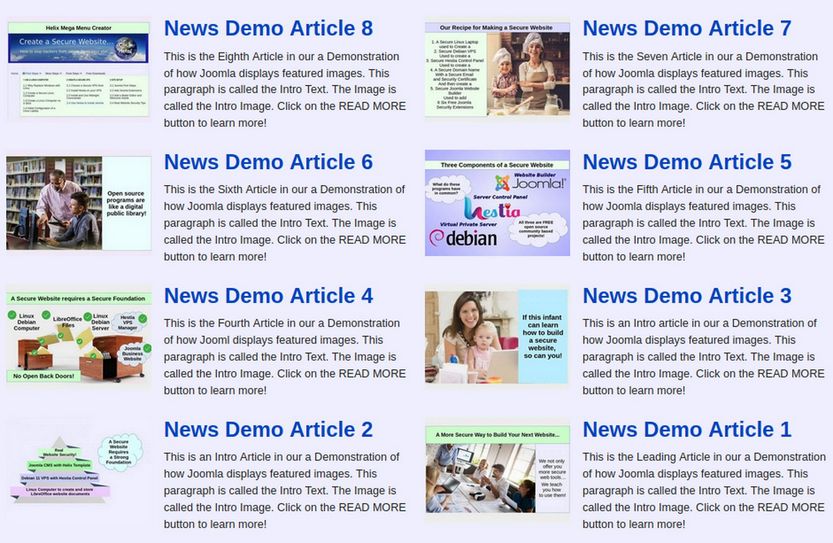
Now 8 Intro articles appear below the leading article (which is in the component) in the same space where before there were only two Intro articles. Your site visitors can quickly scan through these articles to see which ones they want to read. They can then go to the article they want by clicking on either the article title or the article image. This is such a good option, you may want to set the leading articles to 0 and just use this extension to display all articles on the News page.
There are two minor problems with this extension. First, it does not yet include Read More buttons. There is a way to do an “over-ride” to add Read More buttons (although that would take up more vertical space). The process is described in the Mini Front page forum.
Second, the thumbnail images are generated automatically and placed in a folder in the Joomla Media Manager called minifrontpage which is in a folder called thumbnails. It creates its own thumbnail images by scanning the Joomla article Intro Images. If you need to change an Intro Image in the future, you need to delete the minifrontpage folder completely and let it regenerate itself by leaving the media manager and then returning to the media manager. You can also simply re-install the module. But this would require configuring the module again.
Why we do not recommend the Helix Featured Images
Helix adds a tab called Blog Options to the Joomla Article New screen. It looks like we can add images and even links to featured videos from here. However, the Helix Blog Options tool interferes with the functioning of many extensions, including Mini Front Page. This is because other Joomla extensions look for Featured images to be set by the Joomla Intro and Full Article Featured Image tools.
Also, the video Helix Blog Options URL method only works for YouTube and Vimeo. Both of these video hosting services have appalling censorship policies. I recommend Rumble as a more freedom respecting video hosting platform. Later, we will review ways to add Rumble videos to your Joomla articles.
What’s Next?
Now that we know how to create Joomla categories and articles, in the next article, we will take a closer look at website navigation and how to configure several menu item types offered by Joomla.