
It is common for folks to build their first website with a simple free website builder such as Wordpress or a simple commercial web building tool like Wix. They import images and text to their website by going online with a Windows computer used to transfer MS Office documents. Sadly, most Windows computers are already hacked. Many MS Office documents contain hidden malware. These folks fail to realize that the Internet is a Hacker Heaven and it is only a matter of time until their website is hacked. Therefore, in this article, we will review steps for using a Linux computer to move your website pages, images and text from an insecure Wordpress or Wix platform to the much more secure Joomla website builder.
Even if your Windows computer and or Wordpress website has not yet been hacked, you should switch to a Linux computer and then use Linux to move your website content to the Joomla platform. Here is a graph comparing the number of security flaws reported for Windows and Wordpress compared to Linux and Joomla from January to December 2021:
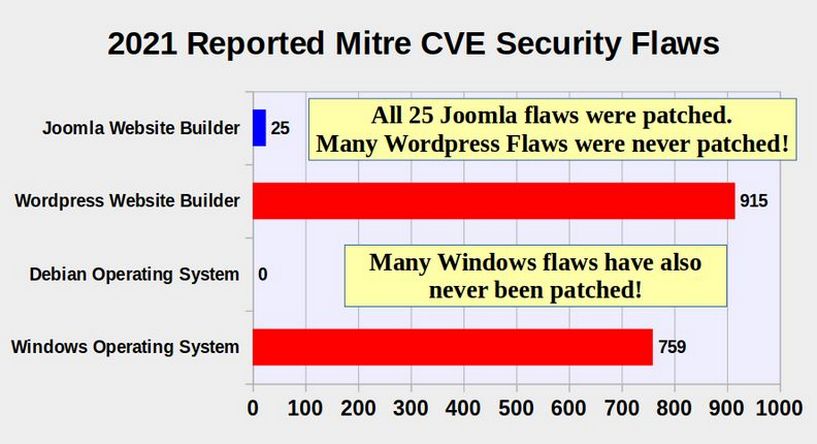
Combined, Windows and Wordpress had 1,674 security flaws reported in 2021. This was a rate of 140 flaws per month. By comparison Joomla and Linux Debian has 25 security flaws – a rate of 2 per month. Therefore, each month you delay making the switch your website is 70 times more likely to be hacked.
It is extremely difficult to tell if hackers have already taken over your Windows computer and or your Wordpress website. On average, hackers will hide in your website files for a year or more before demanding a ransom payment. They do this to prevent you from replacing your website with a month old backup. Hackers like to hide inside of JavaScript files and inside the meta data of your website images.
While you can migrate your Wordpress website from Cpanel to Hestia using the process we described in our previous article, you need be aware that you may also be migrating hidden hackers from your Cpanel account to your Hestia account. To address this concern, you should create a separate Hestia User account for each website, Wordpress or Joomla in order to prevent hackers from moving from a Wordpress website to a Joomla website.
Wix is even worse that Wordpress in that Wix websites are proprietary code, meaning they can only be hosted on servers controlled by Wix. There is no way to move either the files or database from a Wix server to a Linux Virtual Private Server. Wix is the ultimate form of vendor lock in.

We will therefore explain how to transfer a Wordpress or Wix website in the most secure way. We will assume that you have read our entire course, posted on Create a Secure Website dot com and that you have created a Linux Debian home computer. We will further assume that you have created a Linux Debian Virtual Private Server hosted by Canhost. Finally, we will assume that your website is still hosted on some other Wordpress or Wix server.
Here is an overview of the steps you need to take followed by detailed instructions on each step:
Step 1 Create a Category Folder structure for your website.
Step 2 Take screenshots of your existing business website
Step 3 Copy Images and Text from your existing website pages to Libre Writer Documents
Step 4 Create two Writer document for each web page
Step 5 Copy all of your old business emails to Libre Writer documents
Step 6 Get a second business related domain name
Step 7 Create a New Hestia User for your New Domain Name
Step 8 Use Hestia to create new custom domain related email addresses
Step 9 Use Hestia to Create a Database for your new domain name
Step 10 Download the latest version of Joomla 4
Step 11 Use Hestia to Create a new Joomla 4 website
Step 12 Create New Joomla Web Pages
Step 13 Download a Hestia Backup of your business website
Step 14 Take down your existing active business website
Step 15 Create a file system backup of the new business website
Step 16 Create a copy of your new website database
Step 17 Improve Hestia Server settings (if not done earlier)
Step 18 Create a database for your real website Hestia User
Step 19 Copy the files from your new website to your original website file manager
Below are detailed instructions for each of the above steps.
Step 1 Create a Category Folder structure for your website.
While Wordpress stores images and articles by the date they were posted, Joomla websites are organized more like a book into a series of topics placed in categories. It is common for a Wordpress website to have 100 or more posts or articles all on the Home blog page. Each post may have been associated with several tags. These tags confuse search engines into thinking that each article has duplicate content. Each post you want to keep should be converted into a single Libre Writer document and associated with a single category. For more information about creating category folders for articles and images, visit this web page: https://createasecurewebsite.com/more-steps/5-site-content/5-1-create-website-categories-and-folders
Step 2 Take screenshots of your existing business website
Create a business website folder with your file manager on your secure Linux laptop. Then open a new Libre Writer document and name it Old website screen shots. Then open a browser and go to your existing website and use Flameshot to take screen shots of each web page on your existing website. Paste these screen shots into your Libre Writer document. If the web page has a lot of content, it may require several screen shots to capture the entire layout of each page.
Step 3 Copy Images and Text from your existing website pages to Libre Writer Documents
Create a new Writer document called Home Page. Copy and paste the header image and all other images to this document. Then copy and paste all text from the existing Home page to your Writer document. Repeat this process for every page on your website ideally with each page using a separate Writer document.
Step 4 Create two Writer document for each web page
Website content consists of text and images. The most secure way to build a business website is to start with a Writer document alternating text and images. Right click on each image and compress the images to 150 DPI.
Once all images on a page are compressed to 150 DPI, make a copy of the Writer document. If the original Writer document was called My Business Home Page, call the new duplicate Writer document web My Business Home Page. Then create an images folder in your business website folder and in the images folder create a folder called my-business-home-page. Then right click on each image in the web document and save it as image 01, 02, 03, etc in the images folder.
As each image is saved in the images folder, delete the image from the web version of the document and replace it with place holder test such as 01, 02, 03, etc. This will create a text only version of each web page. After creating a new Joomla website, you can create an images folder structure identical to the images folder structure on yor home computer. Then load the images into their Joomla images folders. Then create a new article for each page and use the JCE editor to copy paste the TEXT ONLY (web) version into the Joomla new article workspace. Then delete the image text holders one at a time and replace them with images in the Joomla media manager.
Step 5 Copy all of your old business emails to Libre Writer documents
There is no good way to preserve your old email accounts. We will soon be replacing them with new identical email accounts in Hestia. So all old emails need to be removed and deleted, or if important, preserved in a series of Libre Writer documents.
Step 6 Get a second business related domain name
Ideally, you should purchase a new domain name from Canhost that is similar to your existing business website domain name. For example, if your existing business domain name is my-business-website dot com, if it is available, you can purchase the domain name my-business-website dot org or dot info.
To minimize the downtime of your existing business website, our plan will be to install Joomla on the new domain name. Then use the Libre Writer documents to create each new Joomla web page.
Depending on the number of web pages we need to create, this process might take a few hours – or it might take a few weeks, Once we have the new Joomla website looking exactly the way we want, we will use a backup copy of the new website to quickly replace the existing website on the existing domain. This replacement process should take less than an hour.
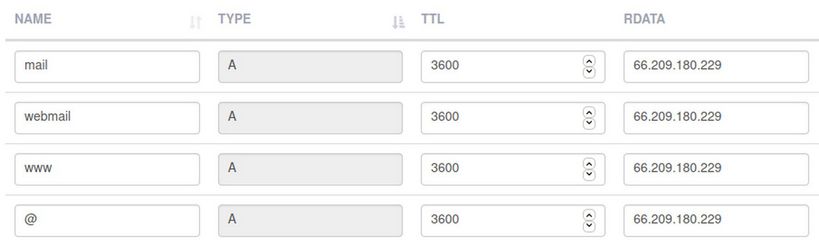
This new domain name will be pointing at the Canhost servers. Then use the Canhost DNS Manager to edit the DNS zone for your new domain name and change each of the top four A records from the Canhost IP address to your VPS primary IP address (the same IP address you used to create your Hestia Control Panel).
Click Save. Then click Add Record to create a CAA record:
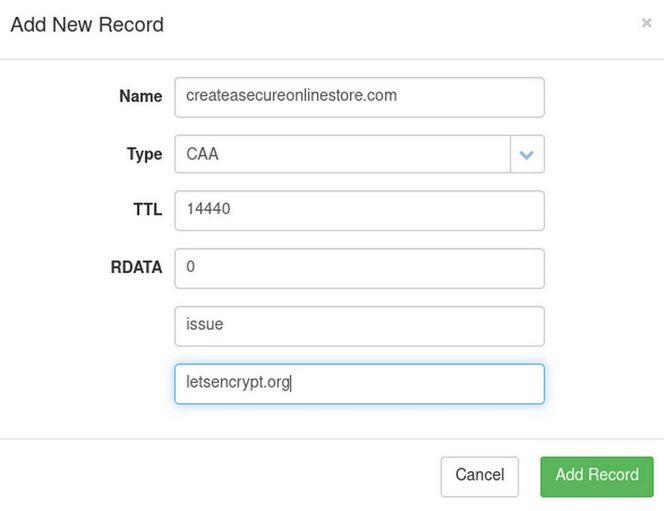
Your domain name goes in the top box. Type is changed to CAA. Rdata is the number 0.
The next box, type issue and the bottom box, type letsencrypt.org. Then click Add Record. The second CAA record is the same only replace the word issue with issuewild. Leave the remaining DNS records in place. They are needed to connect your domain name to the Canhost servers. Then click Save Changes. Then click Client Area, Logout.
Step 7 Create a New Hestia User for your New Domain Name
Next log into your Hestia Server admin page and click Users Add User to add a new user. Then go to the user account and click Add Web Domain. Check Create DNS zone. But do not click Enable Mail. Then click Save. Then click Back. Then click the Edit pencil to edit the domain. Check Enable SSL and Use Lets Encrypt. Then click Save.
Step 8 Use Hestia to create new custom domain related email addresses These will be test email addresses using the new domain name. We can create similar email addresses for the original domain name after we have transferred the website content for the real domain name to a new Joomla website.
Step 9 Use Hestia to Create a Database for your new domain name
Click DB in the Hestia User Top Menu. Then click Add Database. Give the database a short name and username. Note that the full database and username includes the Hestia username and an underscore. Also add a password. Then copy paste the db name, username and password because we will need them when we create our Joomla 4 website. Click Save and Back.
Step 10 Download the latest version of Joomla 4
Go to Joomla dot org and click Download Joomla. Then click Download Joomla Full Package dot zip. Then save the zipped folder to your Downloads folder.
Step 11 Use Hestia to Create a new Joomla 4 website
Use Hestia to create a new Joomla 4 website with the Helix Quick Start package. These steps are described elsewhere. Below we describe the steps for creating a new secure version of your old insecure business website after having installed Joomla 4 with the Helix template and after having configured both Joomla and Helix and after having added the JCE editor.
Step 12 Create New Joomla Web Pages
Go to the Joomla Media manager and add new folders to create an images folder structure in Joomla identical to the images folder structure on your home computer. Then load the images from your website folder in your home computer into their Joomla images folders. Then create a new article for each page and use the JCE editor to copy paste the TEXT ONLY (web) version into the Joomla new article workspace. Then delete the image text holders one at a time and replace them with images in the Joomla media manager.
Step 13 Download a Hestia Backup of your business website
Joomla websites consist of two main parts. These are the files which are in the public_html folder in the Hestia File Manager and the Database created by Hestia. You could download a zipped copy of the files and use PHP My admin to create a copy of the database. Then load these in your real Hestia User account after we make it (see below). However, it is easier to download a Hestia Backup which combines the files with the database. Then load this backup file into the real business website user backup screen after we create a Hestia user for our real business website.
Step 14 Take down your existing active business website
If you have completed all of the above steps, this step can be completed in less than one hour. First, log into your Canhost account and change the name servers for your existing domain name from their prior hosting name servers to the Canhost name servers. This will take your existing business website offline. It will also end your former business email service for a few minutes.
Second, use the Hestia DNS Manager to change the top four A record IP addresses from Canhost to your VPS primary IP address. Also create two new CAA records.
Third, log into your Hestia Control Panel and create a new user for your existing (real) business domain name. Then log into your Hestia User account and click Add Domain Name. Check the DNS box and the Create Mail box. Then click Save and Back. Then click Edit and add an SSL certificate to the domain name.
Fourth, click Mail and get an SSL certificate for your mail domain name. Then create business accounts for your mail domain. This will restore your business email accounts. But there will be no emails in these accounts.
Step 15 Create a file system backup of the new business website
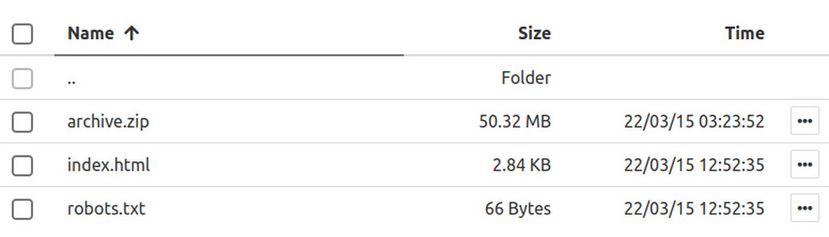
Click Files in the top menu of the user screen. Then click web. Then the domain name. Then the public_html folder. Then check the box in the upper left to select all files in this folder.
Then click zip. This will not affect your existing files. Click Create. A wheel will spin for a couple minutes. When it stops, scroll down the table to see a new file called archive.zip. Click on the three dots to download this file. Then click on the three dots again to delete this file. Then click Exit to Control Panel.
Step 16 Create a copy of your new website database
Click on DB to go to the User Database screen. Note the username and password of your database. If needed, give the database a new password. Click phpMyAdmin
Type in your username and password. Then click Go. Select the database in the sidebar by clicking on the database link. There should only be two options and it is the option other than information_schema. This will cause the database table structure to appear on the right side of the screen. Then click Export:
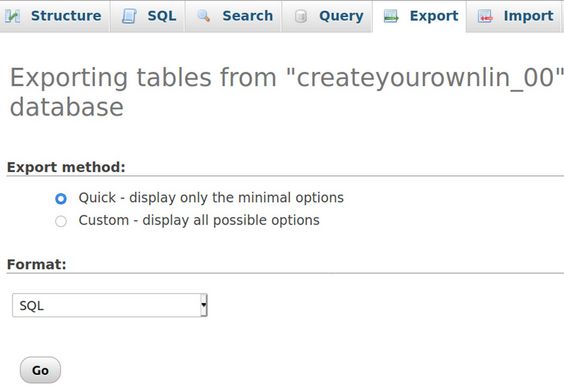
Leave it set for Quick export. Then click Go. Note that export only exports a copy of the original database. It does not delete it. Save the file to your home computer downloads folder. Then close phpMyAdmin. We are now ready to upload your website content to your Hestia Control Panel.
Step 17 Improve Hestia Server settings (if not done earlier)
Before we import the database, we need to change some of the Hestia Server settings to allow more time for the database to import. Open a terminal on your home computer and start a root SSH session with ssh
Then scroll down to line 874. Change default_socket_timeout from 60 to 300 (seconds). Then click Control plus o followed by Enter to save the file. Then click Control plus X to close the file. Then type exit to exit Midnight Commander. Then type exit to exit the SSH session.
Once the Hestia server settings are improved, go back to the Hestia User Control Panel and click on the up arrow in the upper right corner of the screen to go back to the Hestia Admin Control Panel. Then click on the Server settings wheel. Then select php7.4-fpm and click on the restart icon. This will save the changes to the PHP dot INI file.
Step 18 Create a database for your real website Hestia User
Log into your real website Hestia User and click DB. Then click Add Database. Give the database a name, username and password. Then click Save. Then click Back. Then click on phpMyAdmin and log in. Once logged into the new Hestia database, select the database in the upper left corner and click Import in the top menu. You will now see the Import screen. Click Browse and navigate to the copy of the SQL database file to select it. Then click Open. Then scroll down the page and click Go to upload the old database into the new database. Your database will be successfully restored. Log out of phpMyAdmin by clicking on the log out button in the upper left corner of the screen.
Step 19 Copy the files from your new website to your original website file manager
Click Files, web, real website name, public_html. Then click Add files and select the archive.zip file.
Click on the three dots in the archive row. Then click unzip. Sadly, this copied the entire web folder from the other site. Click web, domain-name, public_html to reach the folders and files we need. Click the select box at the top to select all the files and folders. Then click Copy. This brings up the Select Folder screen. Click on the plus sign for the web folder. Then open the domain-name folder and public_html folder. This will start the spinning wheel.
When it is done, return to the first public_html folder to see all of the files have been copied to this folder. scroll down and find the web folder and click on the three dots. Then click Delete. Then click the three dots for the index.html folder and click Delete.
Step 20 Connect your new database to your Hestia website
Your database is restored but it’s still not connected to your Hestia website This is because the database name is still set for your prior database name. To connect your new website to your new database, you have to tell your website the name of the new database, its new username,and updated password. First, you will have to locate the configuration file where database login details are defined.
Click on Files to open the Hestia File Manager. Then go to the public_html folder and scroll down to configuration.php Click on this file to open it. To update the database information, scroll to line 17 18 and 19. Here are the current entries:
public $user = 'xxx';
public $password = 'xxx';
public $db = 'xxx;
Edit these three lines to replace old database details with the details of the database you just created.
public $user = 'Database username goes here';
public $password = 'Database password goes here';
public $db = 'Your database name goes here';
Some of the paths also need to be changed.
Scroll down to Line 36 and change the email address and from name.
Scroll down the page to lines 59 and 60 to change:
public $log_path = '/home/createyourownlin/public_html/administrator/logs';
public $tmp_path = '/home/createyourownlin/public_html/tmp';
Change these paths to:
/home/course1/web/yourwebsite.com/public_html/administrator/logs
/home/course1//web/yourwebsite.com/public_html/tmp
Then click Save and Close. Then Exit to Control Panel. Then open a web browser and type in your real website domain name. The real website is an exact match for our newly built website. Note that the log in to the Joomla Control Panel for the real business website will be the same as the log in for the staging domain name we used to create the new website. Since we do not need two copies of the same website, we can delete the content on the newly built website and add that domain name to the real website Hestia user panel as a redirect.
What's Next?
In our next article, we will review how to update a Joomla 3 website to Joomla 4.