
It is easiest to build a new business website using a domain name that is not currently active. However, it is common to have an existing active business website that you want to move. In this article, we will describe the steps needed to move an insecure but active business website from Cpanel to Canhost and Hestia so you can eventually replace it with a more secure Joomla 4 business website.
There are three cases we will review. In this article, we will look at how to move a Joomla or Wordpress website from Cpanel to Joomla. In the next article, we will review how to move your text, images and web pages from an insecure Wordpress website to a Joomla website. Third, in the following article, we will review how to update a Joomla 3 website to Joomla 4.
Website Migration Overview
Content Management Systems such as Joomla and Wordpress consist of three main components. The first component consists of the website Files which are located in a folder called public_html. The second component is a website database which holds additional information. The third component is the custom website emails which are located in a separate folder. Hestia combines all three of these components into a single Hestia User backup file which can then be easily transferred to another VPS. However, Cpanel requires these three components to be transferred separately. Here is a summary of these steps followed by more detailed instruction about each step:
Step 1 Copy all Business Emails to your Linux computer
Step 2 Set up a Canhost account and transfer your domain names to Canhost.
Step 3 Change your server domain name DNS Records
Step 4 SSH into your Canhost VPS from your home computer terminal
Step 5 Install the Hestia Control Panel to your Canhost VPS
Step 6 Copy your website files as a single zipped folder from the Cpanel server to your home computer.
Step 7 Copy the database as a single file from Cpanel to your home computer.
Step 8 Log into your Hestia Admin Control panel and create a new user. Use Hestia to add a Lets Encrypt SSL certificate.
Step 9 Create New Custom Email Addresses with Hestia
Step 10 Copy the files from your home computer to the new Hestia website root folder using the Hestia File Manager.
Step 11 Copy the database from your home computer to the new Hestia website using the Hestia Database tool.
Step 12 Connect your new database to your Hestia website
Below are detailed Instructions on the above steps
Step 1 Copy all Business Emails to your Linux computer
Let's say you have active business email addresses called
info (at) mybusinesswebsite.com and
news (at) mybusinesswebsite.com
Before your transfer your domain name from your existing host to Canhost, you should log into each of your business related email accounts and copy paste all emails to your Linux computer. You can also forward all of your business emails to a secure ProtonMail account. But it is much more secure to simply keep all your old but important business email records on your Linux computer.
Be aware that there will be a short period of time during the transition when your business related emails will not work. It would be wise to contact your most frequent and important customers and let them know that your business related emails may be down for a day or two and provide them with an alternate email, such as your protonmail email, to use for a short period of time.
Finally, if you have financial accounts tied to your business email address, you should let them know that your email will be interrupted for a few days and make alternate arrangements with them as well.
After we have created our Canhost VPS account and installed the Hestia control panel on our VPS, we will move our website to a new Hestia User account – a process that can be done in a couple of hours. We will then set up a new Hestia domain related email account which can use the same custom business email addresses we were using before to keep all of our future business emails. But there is not really a reliable way to easily migrate your old business emails from Cpanel to Hestia.
Step 2 Set up a Canhost account and Transfer your Domain Name Hosting to Canhost
When you create a VPS account at Canhost, you will need a primary domain name to act as your Name Server domain name. While this could be an existing domain name you already own, you should consider obtaining a new domain name at CanHost, a domain name that you are not already actively using, to create your account.
For example, for many years I have used the domain name College in the Clouds dot org as a central point for all of my instructional courses. When I set up my Canhost account, I purchased the domain name College in the Clouds dot com to use for my name server. I also used the email address College in the Clouds at Protonmail dot com. Then when I purchased my VPS account, I used the name server ns1.collegeintheclouds.com as my name server. Because this domain name was already hosted at Canhost, it was easy for me to change my DNS settings when adding the Hestia Control Panel.
First set up a Canhost account and purchase your name server domain name. Then pay for a VPS-Express-1 Self Managed Cloud Server currently $18 per month with 4 GB RAM, 2 CPU, 20 GB SSD storage. This is enough space to run up to about 20 to 30 Joomla websites. https://www.canhost.ca/vps-hosting/
For Hostname, type ns1.yourdomain.com where yourdomain.com is a domain name pointing at the default Canhost servers. Use a password has at least 10 digits long with at least one capital letter, one lower case letter, one digit and one special character. For System Username, use a name with lowercase letters and no spaces. Change Control Panel from cPanel to No Control Panel. Also specify that you want Debian 11 installed by Canhost onto your VPS.
Write down your VPS username and password as you will need both to log into your VPS server! Leave the SSH box blank. Then click Continue. Pay for the VPS and wait a few hours. You will get an email letting you know your two custom VPS IP addresses.
Then transfer all of your existing domain names to Canhost. To avoid confusion, it is important that both your domain name and your VPS hosting be with the same hosting company. If your domain name is currently active and on a different web host, log into your account at that web host to get an EPP code to transfer your domain name from your current web host to Can Host.
Then log into your Canhost account and click on Transfer a Domain Name. Enter the EPP code and pay for the transfer (which will be about $12 and include an additional year of domain name hosting). This domain name transfer process can take up to a week. When you transfer your domain name to Canhost, by default, Canhost will leave the name servers set for your current web host until you manually transfer your domain name servers to the Canhost servers after you have built your replacement website. For additional information about setting up a Canhost account, see this article:https://createasecurewebsite.com/first-steps/2-create-a-secure-vps/2-2-install-hestia-on-your-vps
Step 3 Change your server domain name DNS Zone Records
After getting a VPS at Canhost using the name ns1.mywebsite.com, you will receive an email from Canhost letting you know the primary IP address of your new VPS.
After getting this email, log into your Canhost account and click My DNS. Then click on the Edit button to the right of your server domain name to view your domain name DNS records. You will see four A records at the top of the list with each pointing to the CanHost IP address. Delete each of these and change the IP addresses to the IP address of your Hestia Server. Then click SAVE at the bottom of the screen.
Create the A record for ns1 and ns2
ns1 and ns2 are sub domains of our primary domain. For example, if your domain is example.com and you want to name your server ns1.example.com, then create the A record for ns1 in the example.com DNS zone pointing to your VPS primary IP address.
To create an A Record, click Create Record. Then change the record type to an A record and type ns1 for the name.
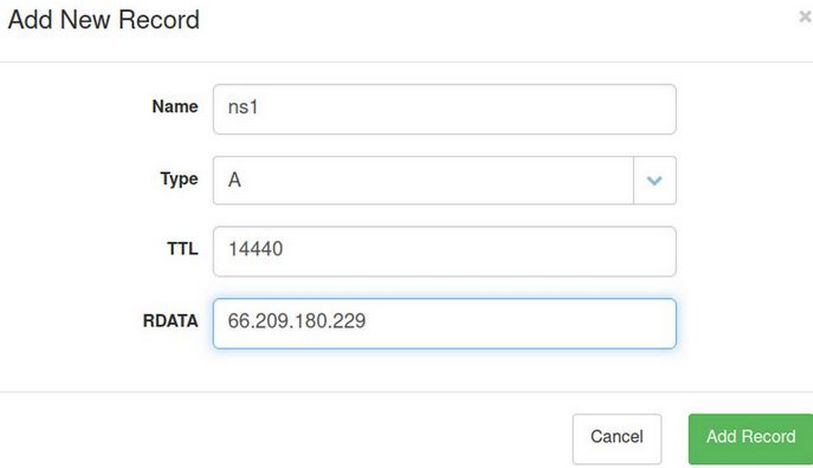
Copy paste your IP address and put it in the RDATA box. Then save and close the file and repeat to create an A record for the sub domain ns2. Also create two CAA records. Create CAA records by clicking on Add Record. Use the Type drop down arrow to choose CAA.
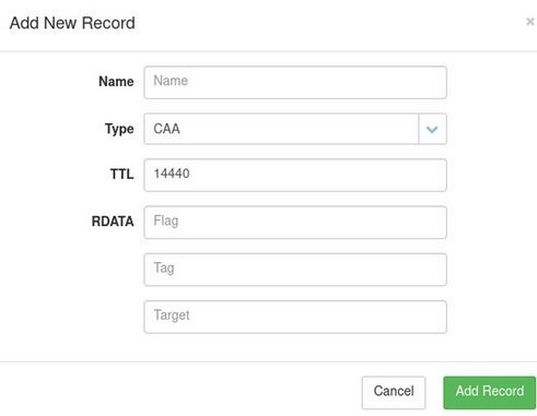
Then type your domain name such as mywebsite.com into the Name box. Type the number 0 into the Flag box and the word issue into the Tag box. Then type the domain name letsencrypt.org into the Target box. Then click Add Record. Then click Add Record again and create a second CAA record with the Tag issuewild. Also change the IP address of all 4 existing A records to point to your VPS IP address. Fully delete the Canhost IP addresses. Then copy paste your primary IP address in all 4 boxes. Click Save at the bottom of the screen.
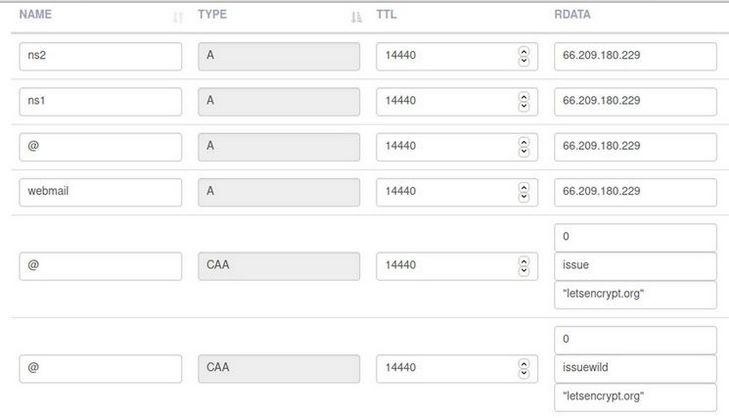
Here are my records for my domain name collegeintheclouds dot com. Note that there are A records for ns1 and ns2. that point to my primary IP address. Also there are two CAA records:
Then log out of your Canhost account. Assuming that you have properly set the Zone Records for the nameservers in the CanHost DNS Manager, your website will now point to the IP address associated with your custom nameservers. However, it may take a few hours for the Internet to update this new route to your website. You can check the status of your DNS records propagation by using any global DNS checker such as
Type in just your domain name and click Search. Red Xs indicate that your domain name has not propagated. Green check marks indicate it has propagated. The problem is that the old database includes an old Cpanel SSL certificate that will not work with Hestia. Therefore, after installing the old database, we need to use Hestia to create a new SSL certificate to replace the old Cpanel certificate.
Step 4 SSH into your Canhost VPS from your home computer terminal
Open a terminal on your home computer. Use the Primary IP address given to you by Canhost in their email to SSH into your new server from our home computer terminal with this command:
ssh yourusername@yourIPaddress>;
Example: ssh
Press Enter. Then type yes to accept the SSH connection. Then enter your VPS password and press Enter. Your terminal screen should then display the line that looks something like: david at ns1.
This means you are logged into your Debian VPS and can begin to edit its settings.
Create a Root User and Password
We need to create a Root User in order to install the Hestia Control Panel. However, we need to change the SSH configuration file before we can create a root user. Once logged into your user SSH session, copy paste:
sudo nano /etc/ssh/sshd_config
to open the ssh configuration file. Use the down arrow to scroll down to PermitRootLogin. Delete the hash at the beginning of the line PermitRootLogin and set the value to yes:
PermitRootLogin yes
Save this file by pressing the Control key and the lower case o key at the same time, followed by pressing the Enter key. Close the file by pressing Control plus the x key at the same time. To make the new setting take effect, restart the ssh server by copy pasting this line into your terminal:
sudo systemctl restart sshd.service
While VPS is running, and still in your user ssh session, copy paste the following into the ssh terminal:
sudo passwd root
Enter your sudo user password (which is your VPS password). Then add a root password typing it twice. Reply should be: passwd: password updated successfully
Then log out of the user SSH session by typing the word exit. Press Enter. Then close the home terminal.
SSH into your VPS as the root user
You can now SSH into your VPS from your home computer terminal with this command: ssh root at yourIPaddress
For example, ssh root at 123.456.789.123
When prompted for the password, use the root password you just created. Once logged in as the root user, uninstall the Canhost firewall called CSF with these commands:
cd /etc/csf
Press enter. The letters cd means change directory. Note that the new directory is /etc/csf. This is the folder that has the Canhost firewall that we need to uninstall as Hestia comes with its own firewall. Then copy paste:
sh uninstall.sh
Then press Enter again. Go back to the VPS root folder with cd /
Next, install the Midnight Commander graphical file manager with this command: apt install mc
Midnight Commander is a graphical file manager that makes it easier to edit and move files in our VPS. We will use Midnight Commander to change some settings after we install Hestia.
Step 5 Install the Hestia Control Panel to your Canhost VPS
While logged in as root, copy and paste the following commands:
apt-get update
apt-get upgrade
Then open a browser and go to the Hestia control panel home page. https://hestiacp.com/
Step 3 on the Hestia Home page shows the normal install command:
wget https://raw.githubusercontent.com/hestiacp/hestiacp/release/install/hst-install.sh
Copy paste this into the ssh root terminal and press Enter. The above command is normally followed by bash hst-install.sh. However, we do not want clamav because it does very little and uses way too much ram. To avoid installing clamav, we will use this for the second command: bash hst-install.sh --clamav no
This screen will then appear:
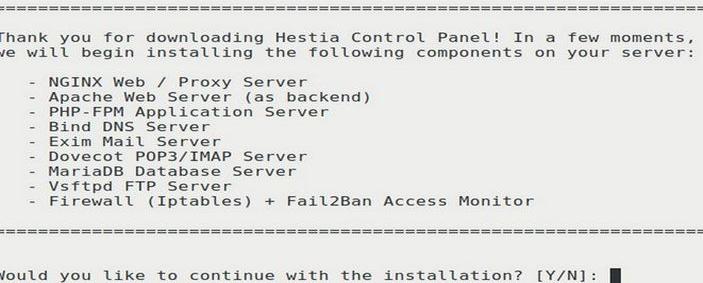
Then type Y. Then type your email and FQDN (which is your name server ns1.mydomain.com). Then press Enter. After the installer finishes, it will end with Press any key to continue. Do not press any key! First, scroll up the page and copy paste the Hestia URL and password!!!
Admin URL: https://123.456.789.123:8083
Username: admin
Password: ImQwmOHv1rg1Yi9g
Then scroll back down the page and press Enter. Then close the terminal. The server will restart. You do not need to log into the server. Instead, open a browser and copy paste the Hestia URL:
You can also log in with the domain name:port number
ns01.example.com:8083
Either way, Firefox may state: Warning: Potential Security Risk Ahead. Click Advanced. Then click Accept Risk and Continue. The Hestia Control Panel Log in screen will appear:
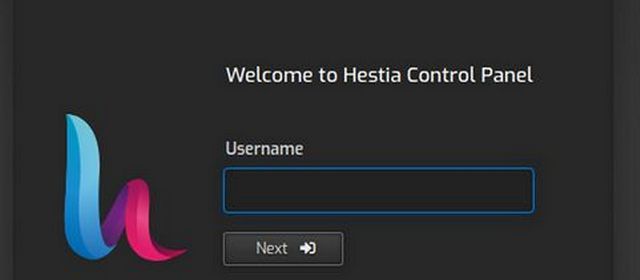
For username, type admin. Then click Next. For password, copy and paste the complex password that you copied from the end of the Hestia install screen. Once you have logged into Hestia, change your Admin Password to something you are more likely to remember. Click on Users in the top menu. Then select the Admin User and click the Edit pencil. Type in an easier to remember password. Each Hestia password must be at least 8 characters long with 1 uppercase & 1 lowercase character and 1 number. Then click Save and Back to go back to the User screen.
Congratulations! You have finished installing Hestia onto your Canhost VPS. You are now ready to copy your website files and database from Cpanel to Hestia.
Step 6: Copy your website files from Cpanel
The actual transfer begins with copying your website Files from cPanel. Log in to cPanel and open the File manager.
Open the public_html folder. Click Select All to select all of the files and folders.
Then click Compress to create a copy of the files and compress them into a zipped file. This screen will appear.

Choose Zip Archive. Then click Compress Files. Then click Close. Scroll down to the well-known.zip file. Select it and download it.
Step 7 Copy the website database from Cpanel
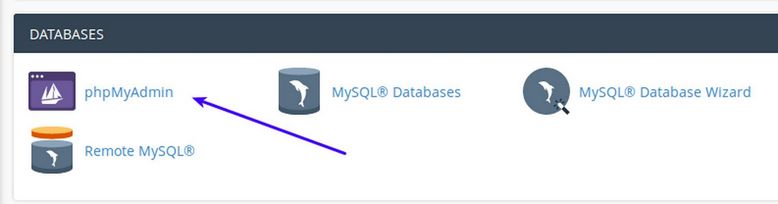
Next, we export the website database. Open phpMyAdmin, which is under Databases in the cPanel menu.
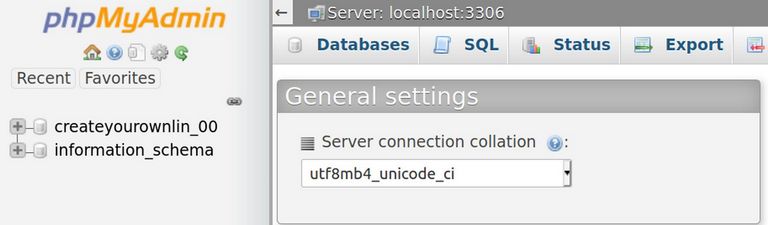
Select the database in the sidebar by clicking on the database link. There should only be two options and it is the option other than information_schema:
This will cause the database table structure to appear in the right side of the screen. Then click Export. This screen will appear:
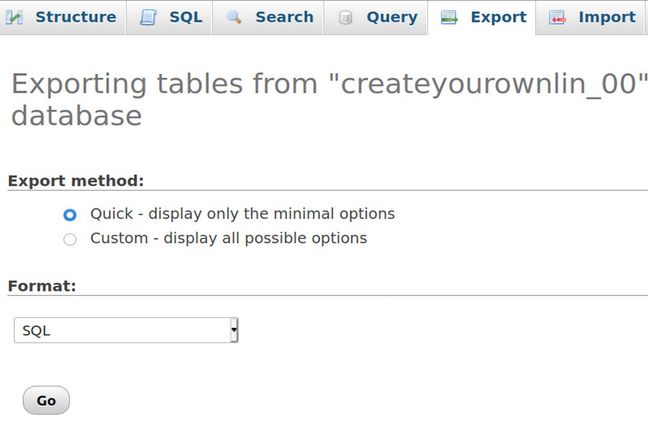
Leave it set for Quick export. Then click Go. Note that export only exports a copy of the original database. It does not delete it. Save the file to your home computer downloads folder. Then close cPanel.
Step 8 Log into your Hestia Admin Control panel and create a new user. Use Hestia to add a Lets Encrypt SSL certificate.
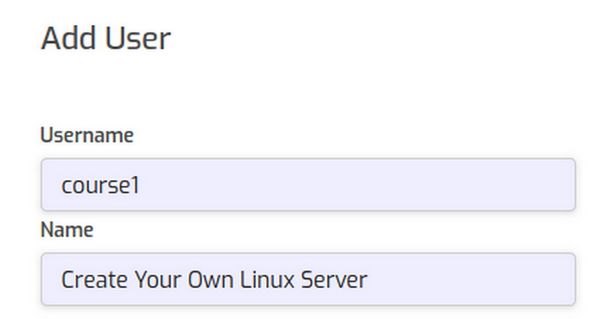
We are now ready to upload your website content to your Hestia Control Panel and VPS. Log into your Hestia Admin panel and create a new user. For example, call the new user course1.
Then add an email address and password and click Save and Back. Then log out of the Admin panel. Then go to your new user account and click Add New Domain. Use the same domain name as your existing Cpanel website. Leave the IP address set for the Canhost VPS server IP address. Check the DNS zone and Enable mail boxes.

Save the Domain Name. Then select the domain name and edit it.
Check Enable SSL for this domain which will bring up additional options:
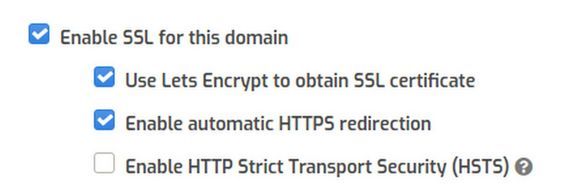
Then check Use Lets Encrypt. Then click Save. Wait for the Certificate to Install. It ended with Changes have been saved – meaning that the new SSL certificate was installed. Then click Save and Back.
Step 9 Create New Custom Email Addresses with Hestia
We also need to add an SSL Certificate to our website mail domain. So click the Mail icon in the top menu. Then select the website name and click Edit. Then add the SSL certificate and click Save. Then wait for the green notice "Changes have been saved." Then click on the Back arrow. Then click the hidden plus sign just to the right of the mail domain name. It is called Add Mail Account.
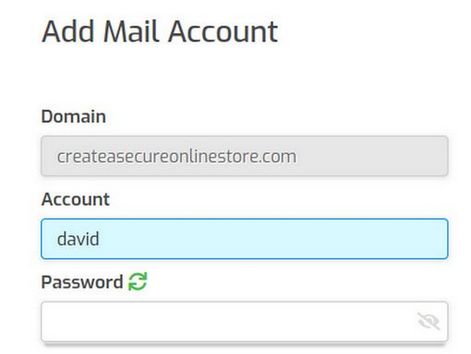
Enter an account name. For example, above I have added the account name david which will give me an email address of
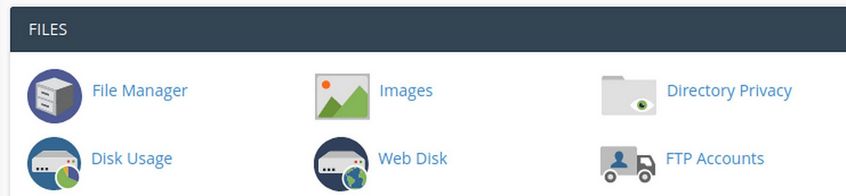
Step 10 Upload Files to a new Hestia User Account
Next, click Files and go to the web, yourwebsitename, public_html folder. Then click Add Files and upload your well-known.zip file into this new domain root directory. Hestia automatically uploads using SFTP.
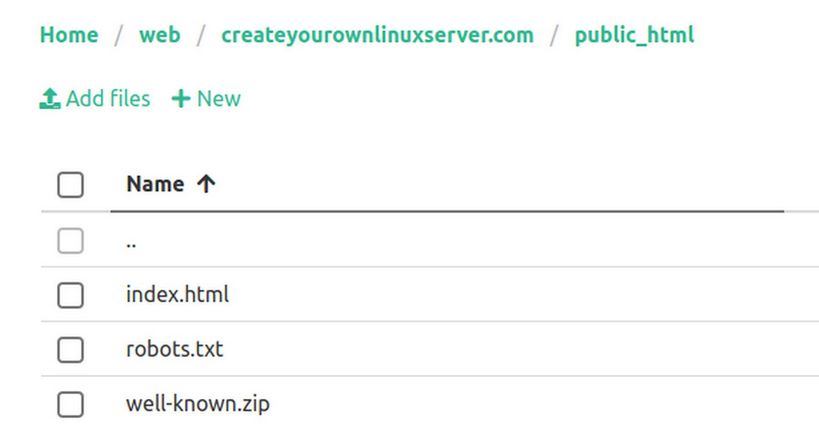
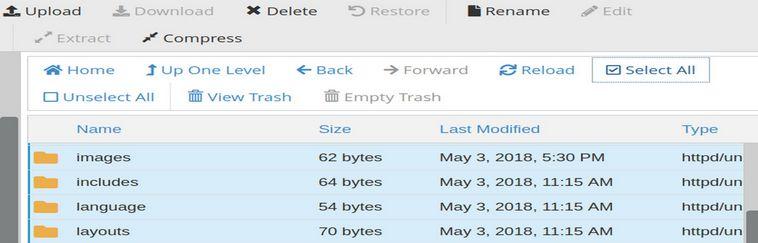
Then click on the three dots to the right of the zipped file and click Unzip. Hestia will unzip the zipped file into the public_html root folder.

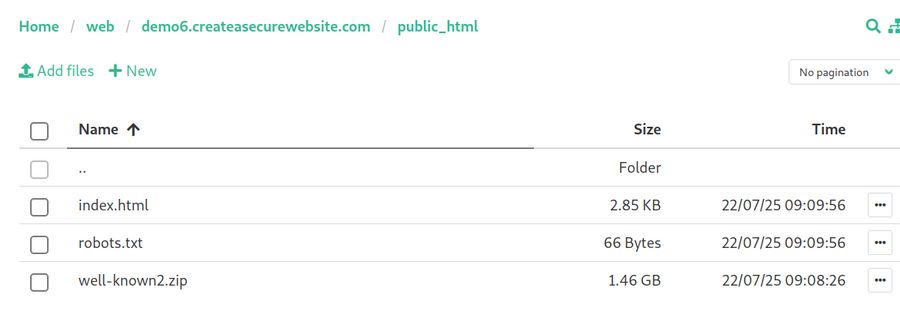
When it is done, there will be lots of folders and files in the public_html folder. Find the Well Known zipped folder and click on the three dots. Then click Delete to delete the zipped folder. Then find the index.html file and click on the three dots and click Rename to rename it old-index.html.

Also find the file htaccess.txt and rename it .htaccess (aka dot htaccess). Then scroll up and click Exit to Control Panel to leave the Hestia File Manager and return to the Hestia User Control Panel.
Step 10 addition: Transfer Large Files with Midnight Commander
The file sizes of my Joomla websites range from 100MB to 300MB with an average of about 200MB. These zipped files can easily be transferred from one website to another via the Hestia File Manager Add File button which has a limit of 1GB. However, some websites have huge amounts of content which may include videos. Thus, these websites may have a file size of more than 1 GB and even more than 2 GB. These zipped files are too large to be transferred by the Hestia File Manager. One could increase the file size upload limit. However, this would be a security risk. We will therefore explain how to transfer large zipped files in Step 10 using Midnight Commander.
Step 10.1: Create Two Demo Zipped Files
Right click on any folder. Then click Properties. This will tell you the file size for all of the files in each folder. Find a folder just under 1GB and another just under 2 GB. Then copy each folder. Then rename each copied folder. Joomla zipped files extracted from Cpanel as part of moving a website from Cpanel to Hestia will have the file name well-known.zip and the well-known folder is the first folder in the public_html folder. Wordpress files extracted from Cpanel will likely have the name includes.zip as the includes folder is the first folder in Wordpress. We will name our first zipped file well-known.zip which is 900 MB and our second zipped file we will name well-known2.zip. It is 1.6 GB.
Step 10.2 Create a Fake Sub-Domain and use it to test file transfers
Log into your Hestia Admin account and go to a User account. Then click Add Web Domain and create a new website. We will create the fake website called demo6.createasecurewebsite.com. It does not need DNS or email. Just click Save. Then click on your File Manager for this User. Click web. Then click on your fake domain name. Then click public_html. Then click Add Files and select your well-known.zip file. This will take several minutes to upload. It may claim to be done before it is actually done. When it is actually done, it will look like this:
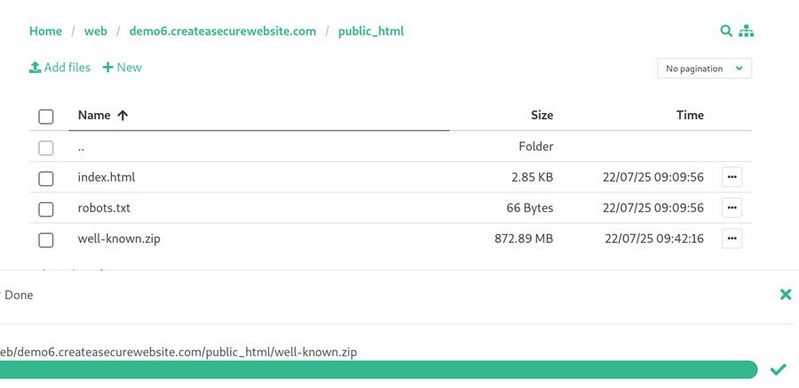
Click X to close the transfer progress bar. Then right click on the thee dots to delete the well-known.zip file. Then click Add Files again and this time add the well-known2.zip 1.6 GB file. This warning will immediately appear:
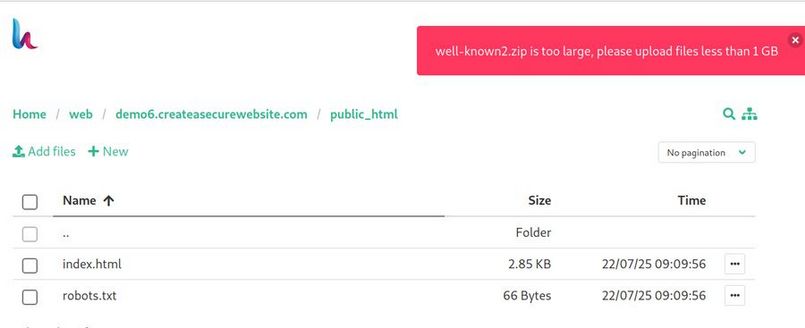
By default, the Hestia File Manager can only upload files smaller than 1 GB. You could split your big file into two smaller files. But this risks make an error and losing important data. Close the Hestia User File Manager clicking Exit to Control Panel. We will use Midnight Commander to load the big file.
Step 10.3: Install Midnight Commander on your Home Computer
You can install Midnight Commander with the Debian Software Center.
Step 10.4: Open Midnight Commander on your Home Computer
Open your home computer terminal. Then type mc and press Enter.
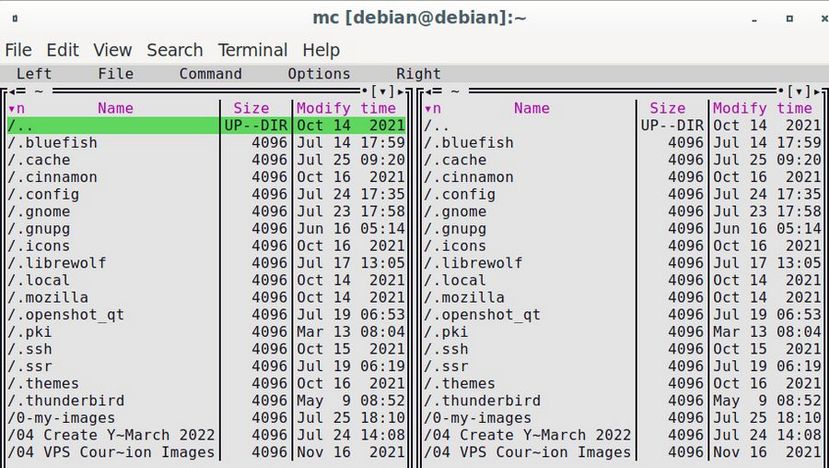
The terminal opens with your Home computer user files shown on both the left and right panels.
Step 10.5: Start an SFTP Session.
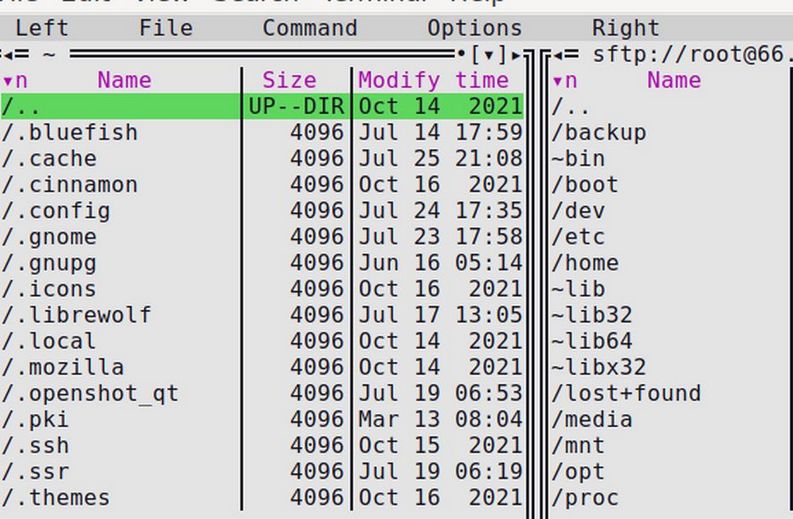
SFTP is much more secure than the traditional file transfer process called FTP. Click on the word Right to open the Right panel. Then click SFTP Link to open this popup:

Enter sftp://root@yourIP>
In my case, it was sftp:
Then click OK. Then enter your Root User SSH password you used in your SSH session to install Hestia to this server. This will change the files on the right panel to the files on your VPS server.
Step 10.6 Navigate to your Fake Website Public Folder
In the right panel, click Home. Then click on the user account you used to create the fake domain name. Then click web. Then click on the fake domain name. Then click on public_html.
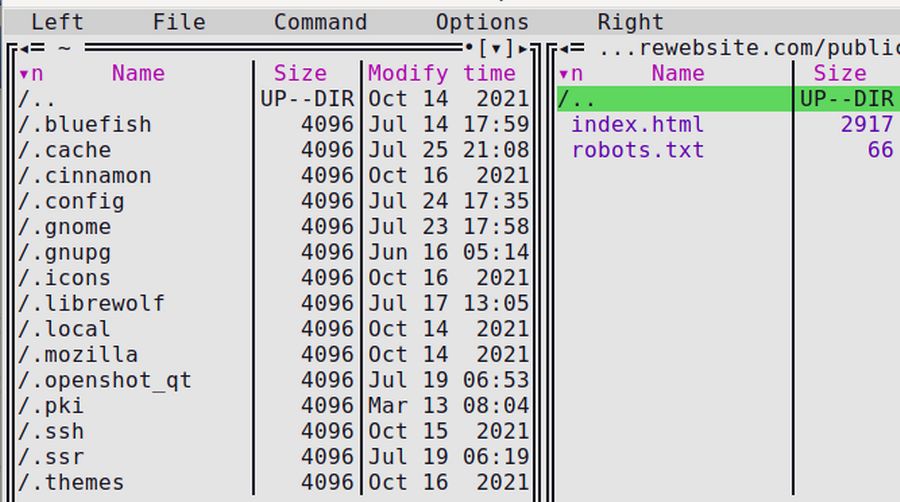
It now shows the default two files in the public_html folder for our fake domain name.
Step 10.7 Upload your large zipped file to this folder.
In the left panel, click on the well-known2.zip folder to select it. Then to the right of the word Left, click File, Move or Copy. This will bring up this popup:
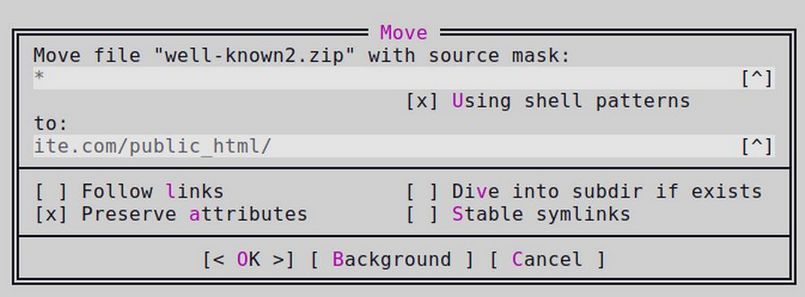
The file to transfer and the path have already been correctly set. Just click OK to being the transfer process.
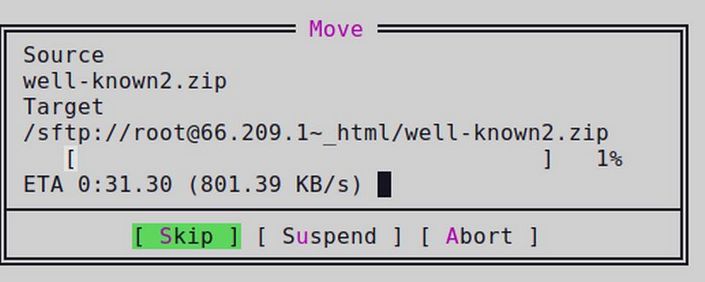
Note that Midnight Commander estimates that this process will take 31 minutes and 30 seconds. Feel free to do something else while you are waiting. But do not close your terminal, or Midnight Commander or the transfer progress popup. When the transfer ends, the right side will look like this:
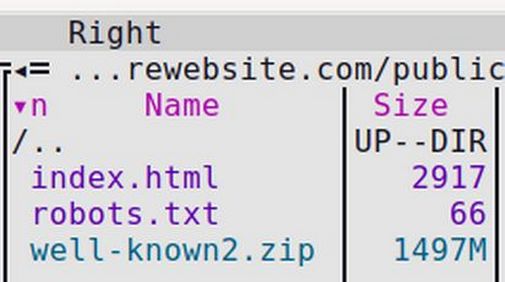
Go back to the Hestia User Control Panel and click Files to open the File Manager again. Here is the public_html file for our fake website.
Thus, it is possible to upload a file greater than 1 GB to your website public folder. But it must be done by Midnight Commander. In your Hestia File manager, click on the three dots to the right of this file and click Delete. Then click Exit to Control Panel. Then select the fake website and delete it.
Then close the User Control Panel and close the Admin Control Panel and close the web browser. In Midnight Commander, type exit into the prompt line. Then press Enter. This will close the SFTP session without shutting down the server. Then close the Home terminal.
Step 11 Upload your database
Add the new database.

Click DB. The click Add Database.
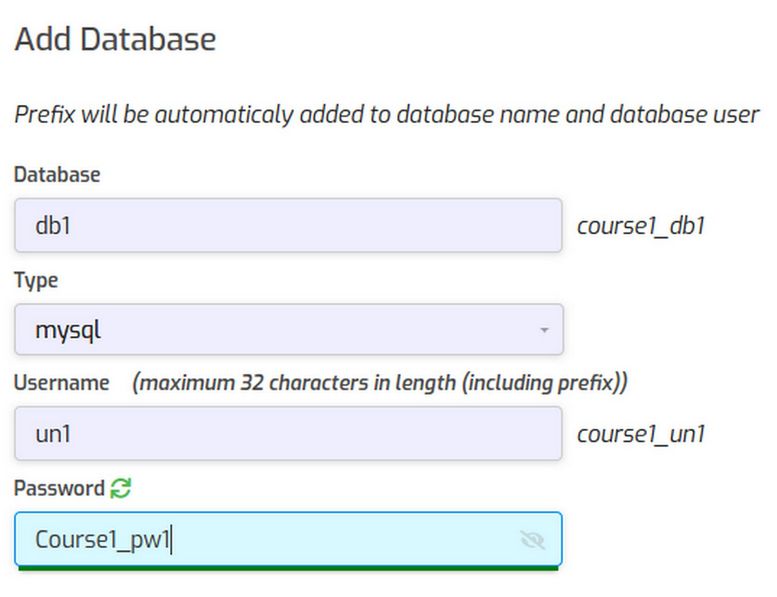
The User Prefix will be automatically added to the beginning of the database name and username. So if your username is course1 and you type db1 into the Database box, the name will be course1_db1. If you type un2 into the Username box, the username will be course1_un1. The database password must have 8 characters including upper and lower case letters and at least one number. Course1_pw1.
Then click Save. Before we import the database, we need to change some of the Hestia Server settings to allow more time for the database to import.
Open a terminal on your home computer and start a root SSH session with ssh
Then type mc to open Midnight Commander. Press Enter to open the root folder. Then scroll up to the etc folder to open it. Then scroll down to the php folder to open it. Then open 7.4 folder. Then open the fpm folder. Then select the PHP INI file and click File Edit. Type Alt plus c to display the line numbers. Then use the down arrow to scroll down to line 388. Change the max_execution_time from 30 (seconds) to 300 (seconds).
Then scroll down to line 874. Change default_socket_timeout from 60 (seconds) to 300 (seconds). Then click Control plus o followed by Enter to save the file. Then click Control plus X to close the file. Then type exit to exit Midnight Commander. Then type exit to exit the SSH session.
Once the Hestia server settings are improved, go back to the Hestia User Control Panel and click on the up arrow in the upper right corner of the screen to go back to the Hestia Admin Control Panel. Then click on the Server settings wheel. Then select php7.4-fpm and click on the restart icon. This will save the changes to the PHP dot INI file.
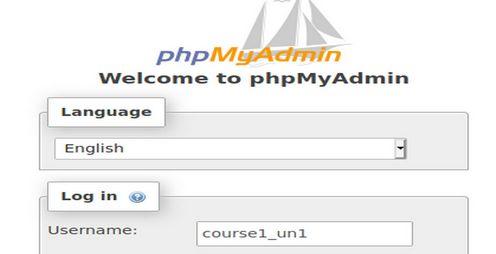
Then click on Users and select the user and click on the right arrow to return to the Hestia User Control Panel. Then click DB to go to the Databases screen. Then click Open phpMyAdmin to log in to the database edit screen. Type in the username and password of the Hestia database you just created. Then click Go.
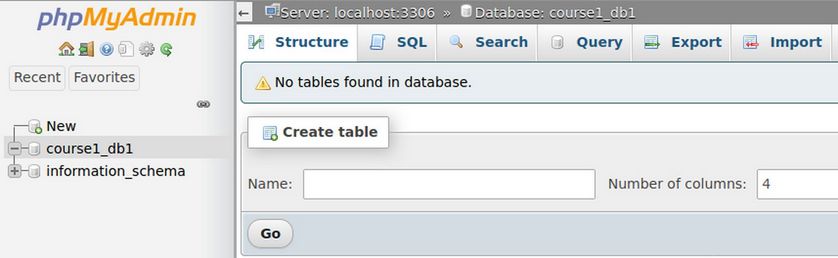
Once logged into the new Hestia database, select the course1_db1 database in the upper left corner and click Import in the top menu:
You will now see the Import screen.
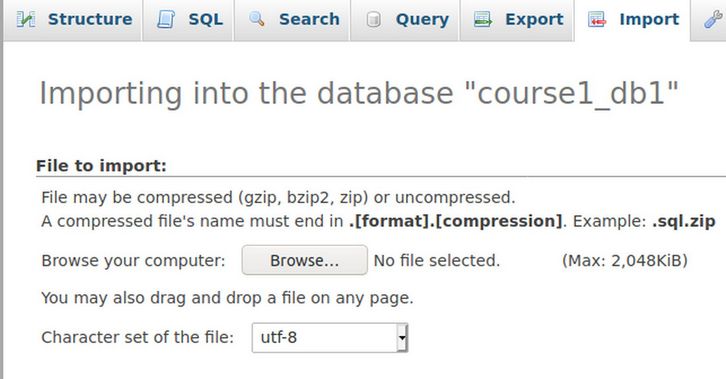
Click Browse and navigate to the old Cpanel SQL database file to select it. Then click Open. Then scroll down the page and click Go to upload the old database into the new database. Your database will be successfully restored. Log out of phpMyAdmin by clicking on the log out button in the upper left corner of the screen.
Step 12 Connect your new database to your Hestia website
Your database is restored but it’s still not connected to your Hestia website This is because in cPanel, your database name might be ‘cpanel_database’. But in Hestia, it might be ‘hestia_database’. To connect your new website to your new database, you have to tell your website the name of the new database, its new username,and updated password. First, you will have to locate the configuration file where database login details are defined.
Click on Files to open the Hestia File Manager. Then go to the public_html folder and scroll down to configuration.php
Click on this file to open it. To update the database information, scroll to line 16 17 and 18. Here are the current entries:
public $user = 'createyourownlin_00';
public $password = 'u53p5S5)S@';
public $db = 'createyourownlin_00';
Edit these three lines to replace old database details with the details of the database you just created.
public $user = 'Database username goes here';
public $password = 'Database password goes here';
public $db = 'Your database name goes here';
Here are my new values:
public $user = 'course1_un1';
public $password = 'Course1_pw1';
public $db = 'course1_db1';
Some of the paths also need to be changed.
Scroll down the page to lines 59 and 60 to change:
public $log_path = '/home/createyourownlin/public_html/administrator/logs';
public $tmp_path = '/home/createyourownlin/public_html/tmp';
Change these paths to:
/home/course1/web/createyourownlinuxserver.com/public_html/administrator/logs
/home/course1//web/createyourownlinuxserver.com/public_html/tmp
Then click Save and Close. Then change the name of index.html to old-index.html. Then delete the well-known.zip file. Then Exit to Control Panel. Now log into your Joomla website and see update extensions and Joomla version. From the Joomla Control Panel, click Extensions, View Updates. Then click on the Joomla Update Now button. Click Install the Update. Joomla updated successfully. Finally, go to Content, Media and upload a new header image.
Log out of the Joomla Control Panel and close the browser. Also log out of the Hestia User panel and close the browser. We are done migrating this website from Cpanel to Hestia.
Summary
You can see that the migration process of moving a website from a Cpanel shared hosting account to a Hestia VPS User account is complex with lots of ways to go wrong. Even if you successfully migrate the old website to the new VPS account, you are still left with a Joomla 3 website – which will later need to be updated to a Joomla 4 website – another complex process. Finally, because the Cpanel shared hosting account is not very secure, there is always the chance that hackers have already buried themselves deep into your Wordpress or Joomla 3 website files. When you migrate your Wordpress or Joomla 3 website files to your new VPS, you may be bringing the hackers along with these old files.
Therefore, since Joomla 4 is now available, a better alternative in the long run is to simply install a new Joomla 4 website on your Hestia User account. Then move only the Joomla 3 images folder from the old website files to the new Joomla 4 website. Then exactly recreate the Joomla categories. Then copy and paste the Joomla articles one by one. Then recreate the Joomla menu items one by one. Then recreate the Joomla modules one by one. If your website has a lot of content, this will also be a time consuming process. But it will end with having a clean and reliable Joomla 4 website with a clean and well structured database.
What’s Next?
In the next article, we will therefore explain how to add a Joomla 4 website to a new Hestia User account as the first step in this alternate website migration process and then transfer text, images and web pages from a Wordpress or Wix website to your new Joomla 4 website.