
Sending email newsletters to folks on your website email list is one of the best ways to keep your community up to date on your latest events. The goal of every newsletter should be a call to action such as clicking on a READ MORE button that goes to a web page with more information. One option for sending newsletters is to use an email sending service like Mail Chimp. However, there are several drawbacks to using these services. Some are free initially but can cost a lot as the number of emails sent grows. Even if you can afford the cost, the real drawback is that you are giving your customers data to a third party service. It is much more secure to use a free Joomla email tool and send the emails directly from your own website. We will therefore learn how to use a newsletter tool called BwPostman. There is an instruction manual available for free download from this website.
Here is a summary of the features of BW Postman
#1 You can use either normal Joomla articles in your newsletter or make a newsletter that is not a Joomla article.
#2 Newsletters can be personalized with the user’s name.
#3 You can create as many mailing lists or groups of email recipients or subscribers as you want.
#4 Newsletters are generated in both HTML and Text formats. This means you can create and use your own custom email HTML templates. In addition, BW Postman comes with default templates and a very easy template creation system.
#5 You can import or export subscribers from a CSV or XML file or any email address book.
#6 You can archive subscribers, newsletters, mailing lists, campaigns and templates and restore or copy them from the archive.
#7 You can include attachments with your emails.
#8 You can set how many mails will be sent at once.
#9 There is a fully functioning newsletter subscription module as well as a module for monthly overview of newsletters. All styles can be over ridden with custom CSS styles.
#10 Webmaster or another person may be informed per mail at each confirmation or unsubscription.
#11 Comes with free captcha tool against subscriptions by robots with a simple math task or as user defined question, adjustable in settings.
How to install and configure BW Postman
Step #1 Download BW Postman (which includes the component, 2 modules and 2 plugins). Here is the link:
https://www.boldt-webservice.de/index.php/en/joomla-extensions/bwpostman.html
Then move the compressed file from your Downloads folder to your website extensions folder.
Step #2 Install BW Postman using the Joomla standard installation process.
Step #3 Initial Configuration
After installation click on Components, BW Postman.
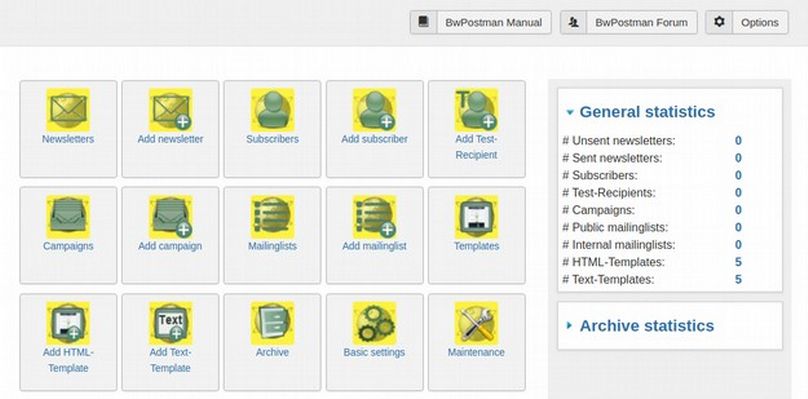
Then click in the top right corner button called Options. Or you click at the button Basic Settings box in the main view.
Options are divided in seven tabs or sections: Basic Settings, Registration, Activation, Unsubscription, Lists View, Single View and Permissions. For all options there are tool tips.
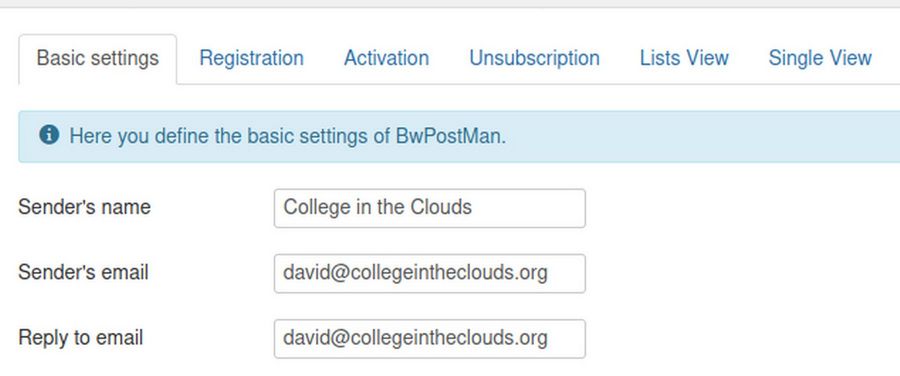
Basic Settings tab
For your server to send your email newsletters, it is important that the Senders Email Address is an email address on your server (not just a Gmail or ProtonMail Address). Change delay between packages of emails from 10 seconds to 60 seconds. Then click Save.
Registration tab
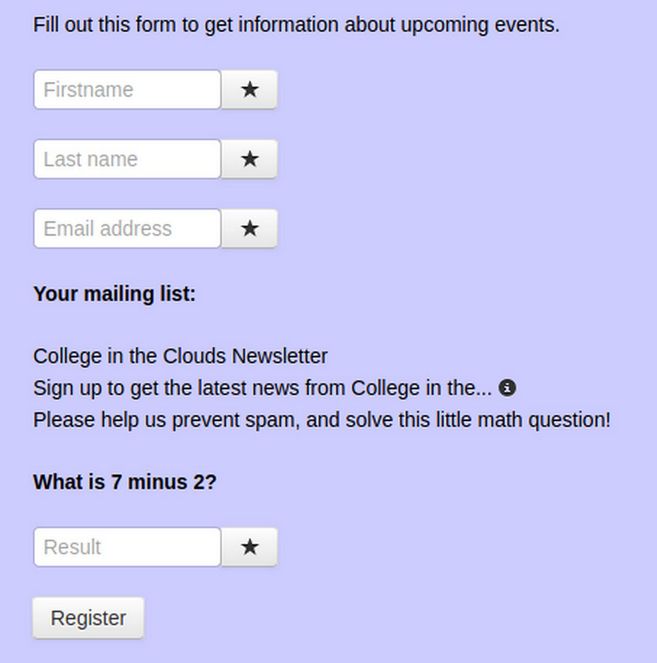
Introduction Text: Change it to “Fill out this form to get information about upcoming events.”
Change Show Gender selection to No.
Change Show Additional Field to No.
Change Show Mail format selection to No.
Change show mailing list description to No unless you have more than one mailing list users can sign up for.
Change Secure Registration form to Question and change question to What is 7 minus 2? Then change the answer to 5. Then click Save.
Activation Email Settings tab
Title for Activation: Enter Hello
Text for activation: Enter Please click on the link below to activate your subscription.
Activation also to webmaster? Change from No to Yes.
Sender Name Enter your name. Mail Address of web master: Enter your website email address. Then click SAVE.
Unsubscription Settings tab
Change no to yes and enter the name and email address. Then click SAVE.
Lists View tab
Change to Hide: Search Field, mailing list filter, campaign filter, Then click SAVE. Single View tab has no changes. Permissions tab has no changes. Click Save and Close.
Step 4: Create a Test Mailing List and add some subscribers to it
In order to test the email sending function, we need to have a list of test subscribers we will use before adding and sending newsletters to a real group. First, we create a subscriber group by clicking on Mailing Lists. Then click New.
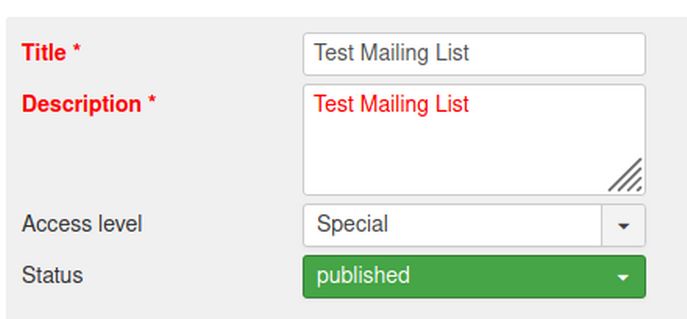
Call it Test Mailing List. Publish it. But make the access level Special. For Description, type Test Mailing List. Then click Save and Close.
Then click on Subscribers and click New. Fill it out with your personal email addrss and mark it as confirmed.
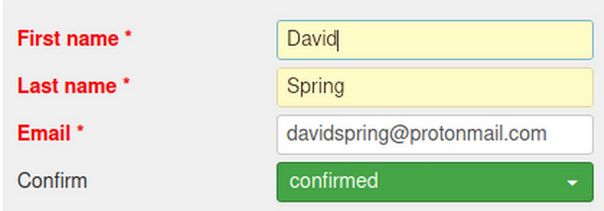
Check the Test Mailing List box at the bottom of the page. Then click Save and Close.
Step 5: Create a Template for our first test newsletter
Click on Templates to see 10 test templates. 7 are HTML templates and 3 are Text Only Templates.
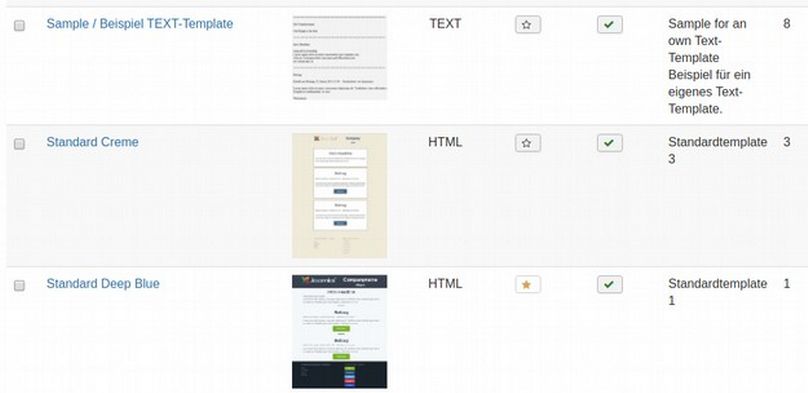
Click on the sixth template, Standard Deep Blue Template.
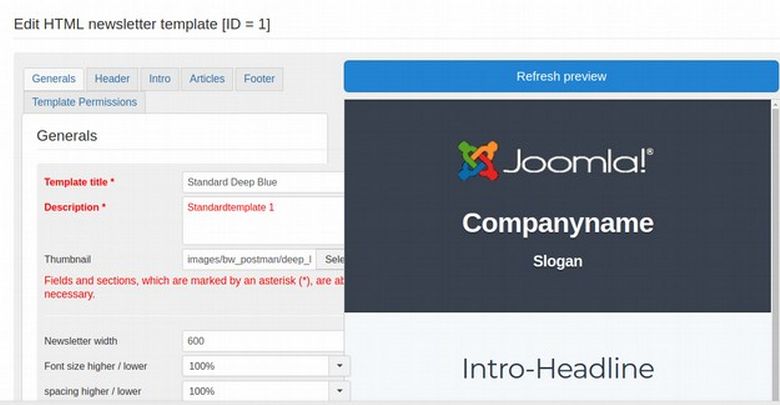
The Template Edit process is divided into five tabs or sections: Generals, Header, Intro, Articles and Footer.
Edit the Generals tab
Change the name of the template from Standard Deep Blue to Our Community Template. Then change the Description from Standard template 1 to Our Community Template Description. Then click Save as Copy to create a copy of it. (The template ID will become ID=11). Leave the thumbnail the same.
Edit the Header tab Next, click on the Header tab.
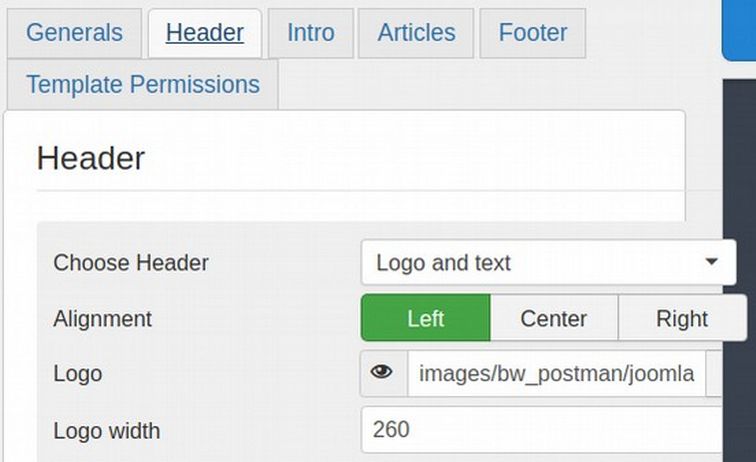
Change the image to your header or logo image. If needed, create this image and load it to your website media manager. You can also use your website header image by changing the setting to image only. Then change the width of the image to 800. If you use a smaller logo, change line 1 to your website name and line 2 to your website slogan. Change the background color to medium blue and font color to light blue. Click Save.
Edit the Intro tab
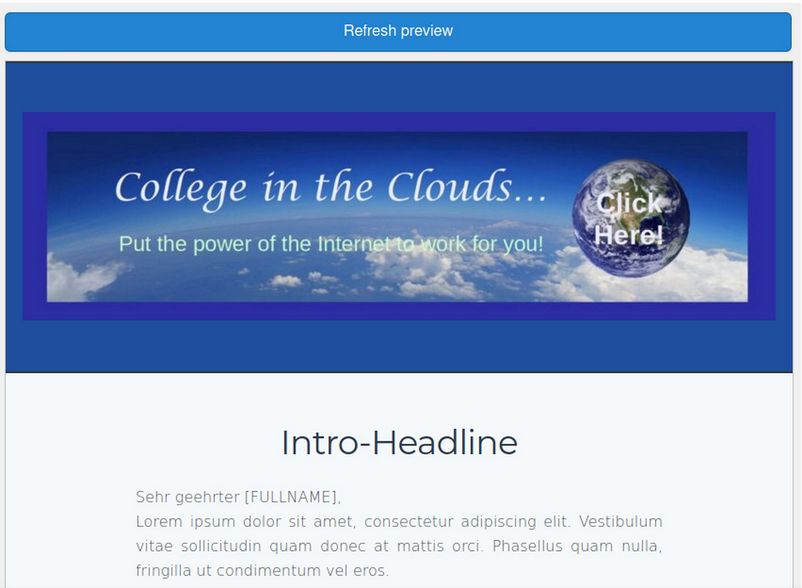
Next click on the Intro Tab. Change the Intro Headline to Latest News
Then change the Intro text to
Dear [FIRSTNAME],
Here is the latest information on what is happening.
Then click SAVE.
Edit the Articles Tab
Next click on the Articles tab. Change the button color and shadow color to Blue. Hide the Article author and Creation Date. Then click Save.
Edit the Footer Tab
Click on the Footer tab. Change the background color to Blue. Change the address text to your website domain name. Change the button headline to Follow Us. Footer Button 1: Change the URL to your website. Hide buttons 2, 3, 4 and 5. Then click Save and Close.
Step 6: Create a Custom Text Only Template
Click on the Standard Text Template 2. Change the title and Description to Our Community TEXT Template. Then click Save as Copy. The ID will change to 12. Then click on the Header tab.
Change Line 1 to News from Our Community Network
Change Line 2 to Working to Protect your Inalienable Rights!
Then click Save. Then click the Intro tab. Change the Intro Headline to Latest News. Then change the Intro text to
Dear [FIRSTNAME],
Here is the latest information on what is happening.
Then click SAVE. Then click the Articles tab. Hide the Article author and Creation Date and Read On button. Then click Save. Then click on the Footer tab. Change the address text to your website domain name. Change the button headline to Follow Us. Footer Button 1: Change the URL to your website. Hide buttons 2, 3, 4 and 5. Then click Save and Close.
Step 7 Create a Joomla Article as a Newsletter
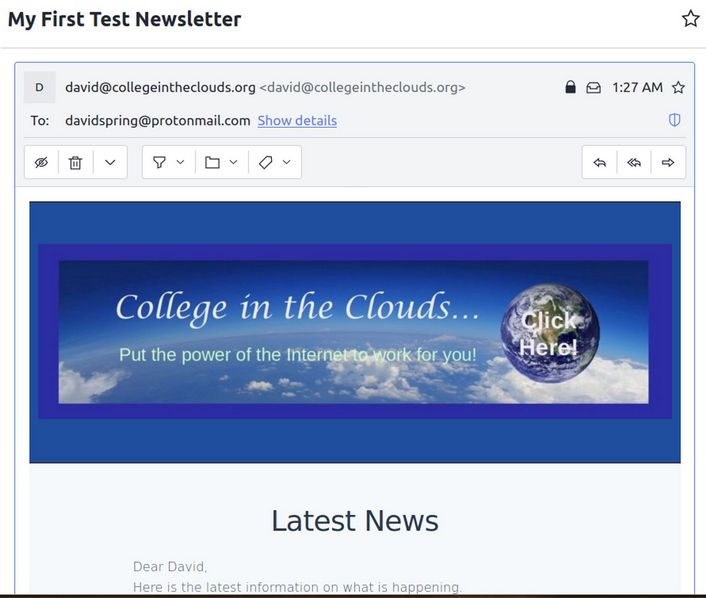
Go to Content Articles New and create a Newsletter Article. For title, type, My First Test Newsletter. For the text box, type:
This is my first test newsletter article description. Here is an image. Then add an image and more text.
Thank you for reading our test newsletter!
Then click Save and Close.
Step 8: Create a Newsletter based on our new custom template
Click on Newsletters. Then click New. There are 5 steps shown here.
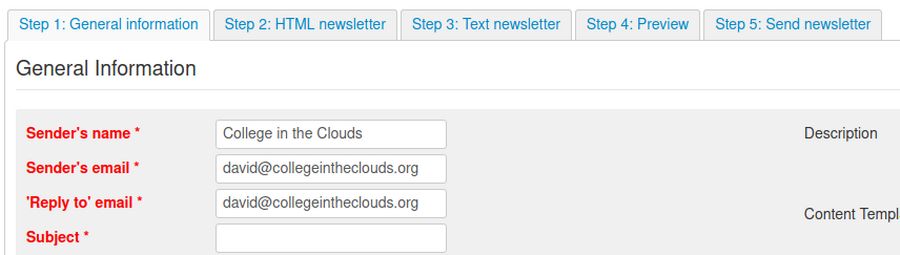
Enter the subject: My First Test Newsletter and type the same in the description. Then click Our Community Template for the HTML Template. Also click the Our Community TEXT Template. Then for Recipients, check the Test Mailing List. Then for Website Content, select the article My First Test Newsletter and use the arrow to take it into the content box. Note: If you add a Joomla article to the Newsletter, it will over ride whatever HTML content you create in Step 2. Click Save.
Then click Step 2. This will show the Joomla Newsletter article you just selected. Changing this is only needed if you do not want to use a Joomla article as a newsletter. Change the title to My First Test Newsletter. Then change the text to This is my first test article description. Here is an image. Then add an image and more text. Then click Save.
Click Step 3: Note that images are not shown in the Text Only Newsletter.
Click Step 4 Preview: Scroll down and preview both the HTML newsletter and the text only newsletter.
Click Step 5 Send Newsletter: Click Send newsletter. (note send test newsletter does not seem to be working).
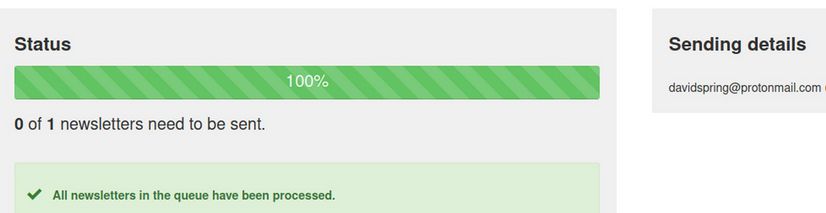
Then go to your personal email account and view the result.
Make any changes that are needed to improve the appearance or content. You are then ready to send the real newsletter to your subscribers. Make a copy of the test newsletter and send it to your real email list.
Create a Website Newsletter Signup List
Click on Mailing Lists. Then click New. For title, type: College in the Clouds Newsletter. For Description, type: Sign up to get the latest news from College in the Clouds. Click Published. Then click Save and close.
Create a Newsletter Signup Article
So that our newsletter signup form can have its own page and menu item, click on Articles New and create a new menu item called Sign Up for our Newsletter. For text, type:
Use the form below to sign up for our coming newsletters!
Then create a menu item for the Newsletter signup page in the Main Menu. To create a list for folks who have signed up on our website (versus folks who have signed up at meetings and events).
Go to Extensions, Modules. Then click on the BW Postman module. Change the Title to Sign Up for Our Newsletter Hide the title. Add a module position Bottom 1 and change the status to published. Then click on Assignment and assign the module to the Signup page. Then click on the Mailing List Selection tab and select the website mailing list you just created. Increase the length of the description from 50 to 70 characters. Then click Save and Close.
Change the Background Color of the Bottom 1 Row
Click Extensions, Templates, Styles. Then click on the Helix template. Then click on Template Options. Then click Layout. Then click the Bottom row arrows. Then click Style. Change the background color to sky blue #ccccff and the text color to black #000000. Then click Apply. Then click Save. Then close the Template Edit screen. Then visit the front end of the website and fill out the form with a test user name and email address.
This message should appear: Registration completed!
Your newsletter subscription has successfully been processed. An activation link has been sent to your given email address. In order to activate your subscription, please click on the activation link in the received email or enter it in your browser by copying and pasting.
Then open your email and click on the link to confirm the subscription.
Activation completed! Your newsletter subscription has successfully been activated!If you want to adjust your settings now, click here.
Then click on Subscribers to confirm that the test person was subscribed. You should also receive an email letting you know that a new subscriber just signed up for your newsletter. Congratulations. You now have a free and fully functioning email newsletter tool.
Seven Steps to Write a Newsletter
#1 Use Libre Writer to create your newsletter articles (Do not use a Microsoft Office DOCX document). You should use a Linux computer for this as you will also need to use your Linux computer to log into our website!
#2 Name your Newsletter Document and place it in correct category in your File Manager SAVE website Newsletters Folder
#3 Seek out or create an image for your newsletter.
#4 Compress the Image using the Libre Writer compress image tool.
#5 Create a text only copy of your Newsletter by clicking on File SAVE AS and then saving a duplicate copy of your Newsletter in your Newsletters folder.
#6 Create a Folder with your File Manager for your Newsletter Images
#7 Save your newsletter image in your newsletter images folder leaving image placeholder text such as image01, image02 in your text only newsletter.
Eight Steps to Post and Send a Newsletter
#1 Log into your Joomla website and open the newsletter images folder in the Joomla Media Manager
#2 Add your newsletter image to the Newsletter Images Folder.
#3 Post the Text Only Version of Your Newsletter by going to Components, BW Postman, Newsletters. Then click Sent Newsletters. Then click on the latest sent newsletter (aka SAVE Expands) and click Duplicate.
#4 This will create a Duplicate of the previous newsletter with all of the correct settings already in place. Click on Unsent Newsletters. Then click on the copy to open it. Change the Subject to rename the copy to the name of your new newsletter. Also change the description. Then click SAVE.
#5 Click the Step 2 tab. Delete the existing text and images except for the title text. Then change the title to your new newsletter title. Then copy and paste the new Text Only document below this new title.
#6 Re-insert your newsletter image into your newsletter by clicking on the images icon in the Editor. Then delete the extra spaces between image and paragraphs of the newsletter.
#7 Click on the Step 3 tab. Then delete the existing text and paste the text only version of your new newsletter here without the image (delete the image placeholder text). Also change the Headline to your new newsletter headline. Then click SAVE.
#8 Click on the Step 4 tab to preview your new newsletter. If it looks OK, click on the Step 5 tab and click Send Newsletter. This will send your newsletter to everyone on all of our lists. If you want to only send the newsletter to some of our email lists, then click on the Step 1 tab and unselect any lists you do not want to send the newsletter to.
Congratulations! You can now send out newsletters in just a matter of minutes whenever you want!
What’s Next?
In our next article, we will review how to add a free Downloads Manager to your community network.