
In this article, we will explain how to create a Linux Debian Computer on a Stick - which is the least expensive option in the process of moving from Windows to Linux.
USB Drive Size Options
The minimum size we recommend is 64GB. For about $10 more, you can get a $128 GB USB3 drive.
64 GB SanDisk USB 3…Retail $10, with Debian Installed $40
Note that this drive will only last about one year – so please keep your files backed up.
128 GB SanDisk USB 3 … Retail $20 with Debian Installed $50
This drive will last about two years. Still keep your files backed up.
External SSD Drive Options More durable and faster than USB3
JOIOT 120 GB Retail $35 with Debian Installed… $70
Lasts about four years and is five times faster than a USB 3 Drive
JOIOT 250 GB Retail $45 with Debian Installed $80
Lasts about five years and is five times faster than a USB 3 Drive
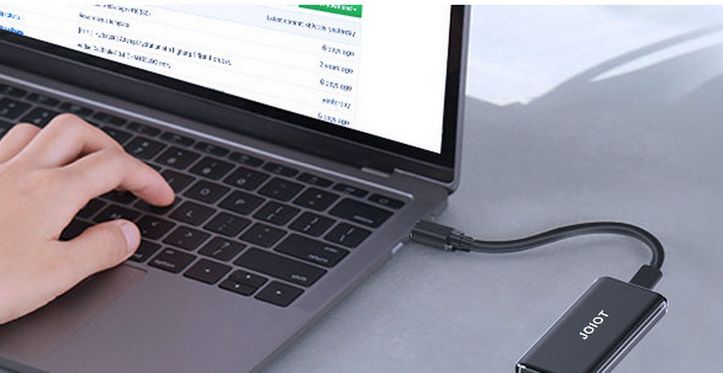
Here is what an External SSD looks like connected to a laptop:
There are some laptop brands that will not allow connection to an external SSD with an independent operating system. If this is the case, then we will need to figure out some other option.
Obtain an External USB Drive or SSD Drive
You’ll need a USB drive with enough storage capacity to set up persistence. The least expensive option is to buy a USB 3 drive with at least 64 GB of storage . Since the Linux Debian operating system takes less than 14 GB of storage, this will leave you 50 GB for your documents, images and videos.
However, the bigger the USB drive, the more persistent storage you can have. Also, the more storage you have on the drive, the longer it will last. You can get a 64 GB SanDisk USB 3 drive for as low as $10. The problem with these small USB drives is durability. Do not expect them to last more than a year when running a full operating system. A 128 GB SanDisk USB3 costs about $20 and will last about two years.
A more durable option is to buy an External USB SSD.
JOIOT 120 GB Retail $35 with Debian Installed… $70
Lasts about four years and is five times faster than a USB 3 Drive
JOIOT 250 GB Retail $45 with Debian Installed $80
Note that you will also need a 16 GB USB stick to use as a simple non-persistent Live USB during the install process. These cost less than $10 and can be re-used to create several persistent drives.
UEFI Boot and GPT versus Legacy BIOS Boot and MBR
In addition to USB sticks versus USB external drives, there are several other different categories of USB Persistent drives. A huge difference has to do with the type of boot loader built into the host computer used to create the persistent drive. Many older computers use a boot loader based on BIOS (Basic Input Output System). BIOS in turn divides a hard drive up into partitions using a Master Boot Record or MBR Partition Table. Most newer computers use a boot loader based on UEFI (Unified Extensible Firmware Interface). UEFI is very complex – and is 20 times bigger than BIOS. UEFI divides a hard drive into partitions based on a Global ID Partition Table (GPT).
If you use a BIOS computer to create your external drive, you will likely wind up with a BIOS based external drive using an MBR Partition Table. This drive will likely not be recognized by a newer computer built on a UEFI GPT foundation. If you use a UEFI based computer to create your external drive, you will likely wind up with a UEFI based external drive using a GPT Partition Table. This will likely not be recognized by an older computer built on a BIOS MBR Foundation.
Some older computers can be set for either Legacy or UEFI boot. If this is the case with your computer, set it for Legacy Boot or BIOS Boot as UEFI boot can have problems with the Boot loader for the Persistent stick over-writing the boot loader for the UEFI computer.
Danger of UEFI Boot Loader Hijacking
Boot loader hijacking is a problem with UEFI host computers where the USB Live stick mistakenly replaces the boot loader of the host computer with the boot loader of the USB Live Stick during the external drive creation process – even though the boot loader should actually just be copied to the USB persistent external drive. This results in the host computer no longer being able to start!!!
Also, with UEFI host computers, the installer might place an entry in NVRAM (non-volatile random-access-memory) pointing to the Grub Boot loader on the USB drive rather than the actual Grub boot loader on the Host computer. If this happens, the host computer will no longer boot without the external USB attached! This does not occur on BIOS based computers. But it is common on UEFI computers due to the extreme complexity of UEFI. The problem is that UEFI is a monster. We all need to stop using UEFI computers!
There are ways of working around this UEFI problem. We discuss some options below. But it requires extreme caution to avoid having the USB live stick hijacking the boot loader of your host computer. If this happens, it may be very difficult to start your host computer again and may even require rebuilding your host computer. This is why you should always back up all of the data and programs on your host computer before using it to create a Persistent USB. None of this applies to creating a simple Live USB used to reflash computers. This only applies to creation of USB drives with persistence.
Persistence with Casper Partition or Persistence with Full Install
Many Persistent USB stick creation tools will create a separate partition called a Casper partition. While this may seem like a good idea, this method has problems because it will not help you learn the default Linux Mint File System. Since our primary reason for creating a persistent USB is to learn the Linux way of doing things, we will use the full install method (also called a direct install).
It should be noted that the full install method is much more durable than the Casper method. Also the full install method allows you to update the operating system and programs over time because the file structure is nearly identical to a normal Linux Debian install. Finally, a full install tends to work better on nearly any host computer. The only problem might be if your computer has proprietary drivers. You may need to do a bit of research on how to install these drivers to your full install USB drive. The full install is also more secure than the Casper partition install. Finally, if you have problems with a particular program working in your website development test environment, you are more likely to find a solution on one of the Linux forums because there are huge numbers of people using full install Linux computers versus only a few people using the Casper partition method.
Either way, you should always backup any data you have on your persistent USB drive as well as backing up any data you have on your host computer as any persistent storage might get destroyed during the website development process.
Back up your data on your computer
There is always a chance of something going wrong during the persistent USB install process. You should therefore always back up your data and programs on your host computer to an external drive before doing this process. So you really need three USB 3 drives:
#1 for a copy of all of your Host computer files and programs. $20 at least 64 GB
#2 for your Live USB stick. $10 16 GB
#3 for your Persistent External USB Drive (computer on a stick). $20 to $70 at least 64GB.
Now that we have 3 USB drives, and have used one USB to create a copy of all of the documents and programs on our host computer, let’s review the Full Install process for creating a persistent USB drive. While this external drive creation process can be done on a Windows laptop, it is best to use a Linux laptop. This is because Windows computers, all of which run on UEFI, are designed to sabotage drives and install hidden back doors into hard drives.
Step 1 Format all three of your USB drives
Make sure the USB 3 you will turn into a Persistent USB Drive is properly formatted. Note this process will wipe out any data on the USB 3 drive. Download the DEB package for the USB Stick Formatter from here: http://packages.linuxmint.com/pool/main/m/mintstick/
Scroll to the bottom of the page and download the latest deb package. Then click on it to install it with the Deb Package Installer. Then click Start, Accessories and click on USB Stick Formatter to open it. Insert the USB 3 drive into your Linux Laptop. Open the USB Formatter and select the USB drive.
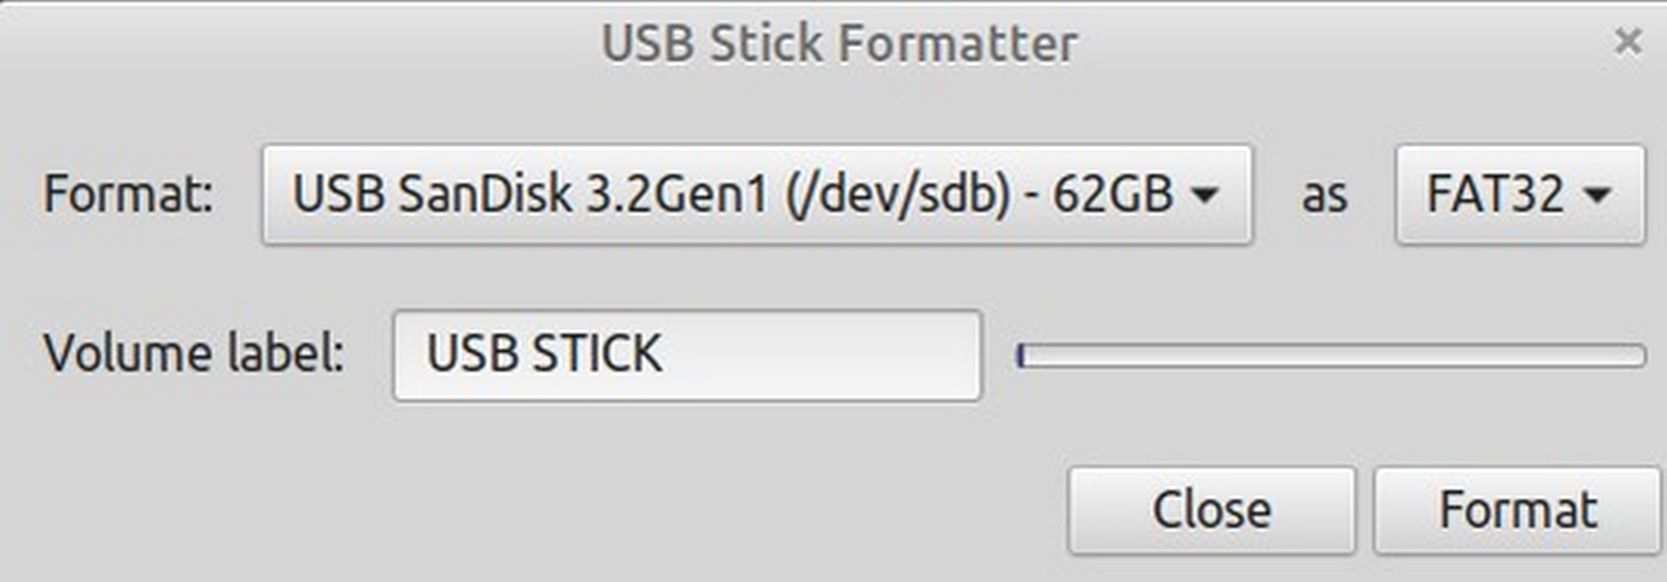
If using Debian, you can also just open your file manager and right click on the USB drive. Then select the Format option. A Format dialog box will open. In the Volume Name field, type a name for your USB drive such as Debian Live USB. Switch on the Erase button to erase existing data. Note that any data on the USB drive will be overwritten. Choose the file system type FAT32. Then click the Next button located at the top right corner. A Confirmation dialog box will appear. Confirm the information so that you do not format incorrect storage by mistake. After that, click the Format button.
Install and Use Gparted
Gparted is a free open source Partitioning program. To download it, open the Debian Software Manager and type Gparted into the Search Box. Then click Install. You can also install Gparted in Debian by open a terminal and copy paste:
sudo apt-get install gparted
Then open Gparted by going to the Start menu, Administration, Gparted. The screen opens to our internal hard drive which is called sda.
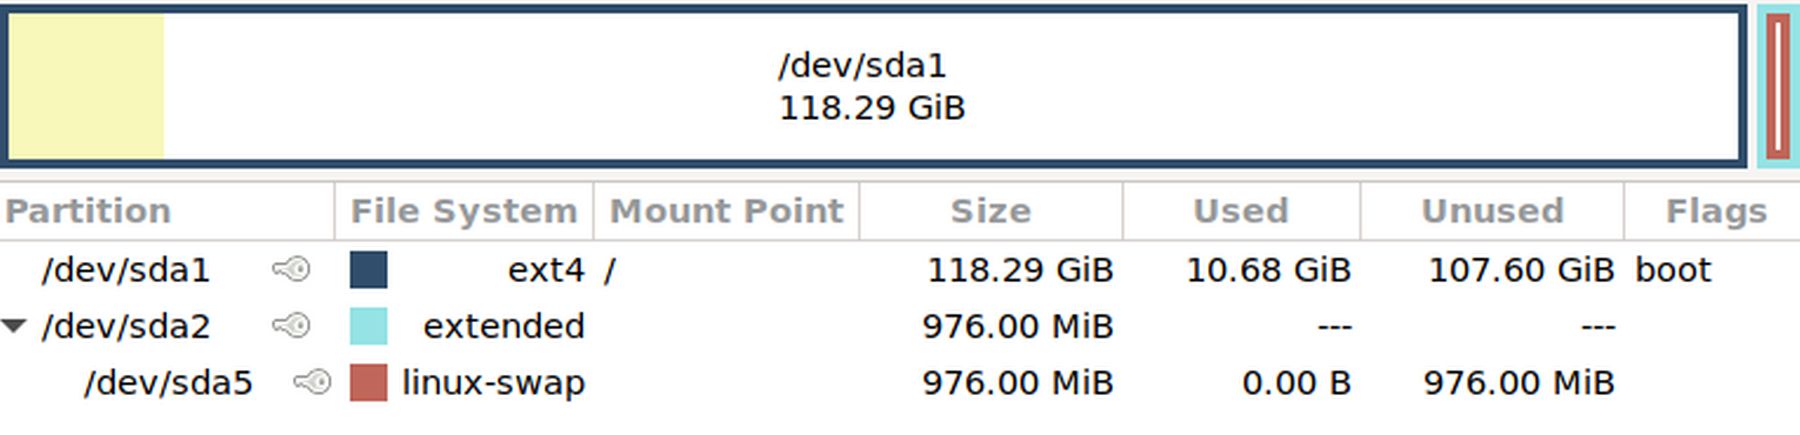
This screen shows that sda has two partitions, sda1 and sda2. Sda1 has the Linux operating system root partition, file manager (which holds our documents and images and videos) and the boot program. Sda2, has a swap partition used to extend the RAM.
What this screen does not clearly show is that our internal hard drive is using a MBR partition table. Partitioning experts would know this must be true because only MBR tables use “extended” partitions. To see our USB computer on a stick, insert it into your laptop USB port and then restart the Gparted program. Click on the drop down arrow in the upper right corner and click sdb.

The drive called sdb is partitioned almost exactly like our Debian laptop in sda.
Step 2: Back up your documents and programs on one of your USB drives
This involves placing all of your documents in folders and then copying each folder to your backup USB stick. Then type up a list of all of your important programs and copy this list to your USB backup drive.
Step 3 Download the Debian 11 Cinnamon FULL LIVE ISO file
Previously, we used the simple Debian Calamares installer ISO to install Debian on a laptop. However, the simple Calamares installer can not install Debian to create a computer on a stick. Therefore, we need to use the traditional version of the Debian installer ISO to create a FULL LIVE USB which we will then use to create our computer on a stick. FULL means it is the traditional Debian installer and LIVE means you can practice using Debian before you install it.
As with the Calamares installer, there are many different desktop versions of the FULL LIVE ISO. To download the FULL LIVE ISO, go to this CURRENT page to download the 64 bit version of Linux Debian Cinnamon ISO file with non-free software (the non-free software may be needed to install WIFI and Printer drivers on your computer).
https://cdimage.debian.org/cdimage/unofficial/non-free/cd-including-firmware/current/amd64/iso-dvd/
Select the option at the bottom of the page which is firmware-11.2.0-amd64-DVD-1.iso with a size of 3.7 GB
Alternately, you can go to this page which is a specific page for the same iso. Scroll down the screen to the Debian live 11 amd64 cinnamon plus non-free iso option. Then click on it to download it. It will be about 3 GB.
https://cdimage.debian.org/cdimage/unofficial/non-free/cd-including-firmware/11.2.0-live+nonfree/amd64/iso-hybrid/
Step 4 Create a Non-persistent USB Live Stick
The Full Install method involves creating a simple USB live stick with Etcher. This stick does not need to be more than 16GB in capacity. You can download the Etcher App Image from this link:
Extract the zipped file to reveal the App Image. Then click on Etcher to bring up this screen:
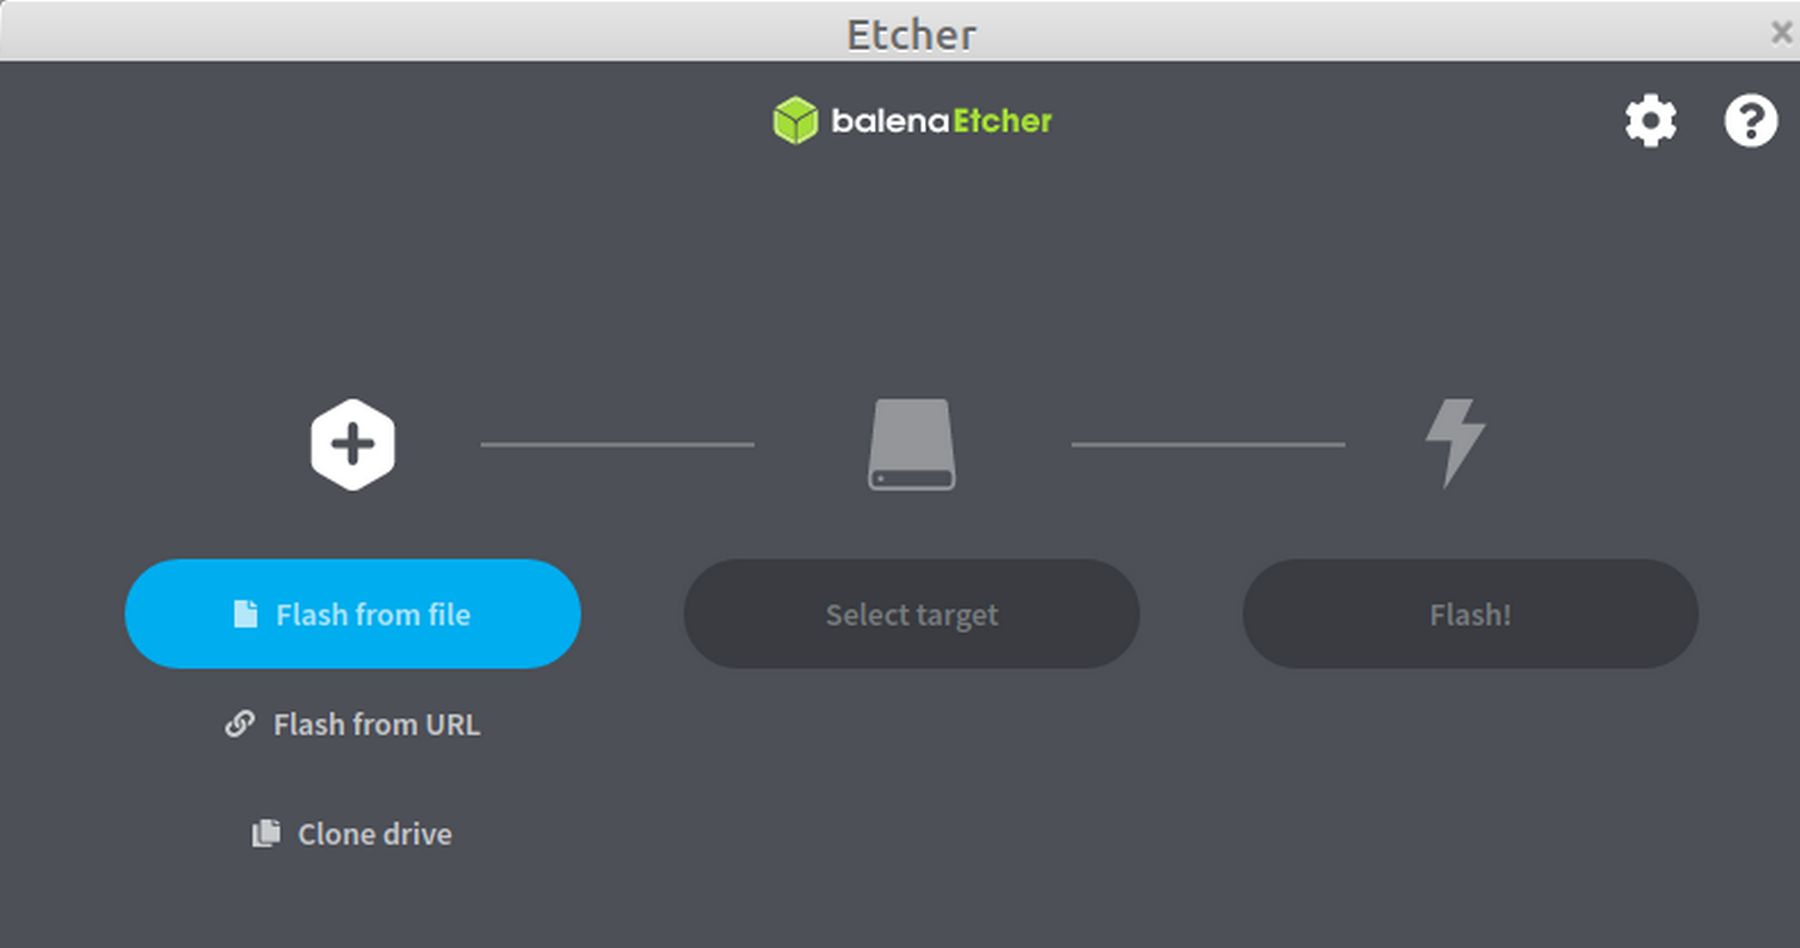
First insert a USB drive into a USB port. Then click Select Target and navigate to your USB drive. Note that whatever is on the USB drive will be erased during the installation of Debian. Then click Flash to flash the USB drive with Debian. When done, you will have a Linux Debian Live USB. You can use this USB to reflash as many computers as you want. You can also use it to create a Persistent USB aka a computer on a stick.
Step 5 Determine if your Host computer is a UEFI GPT computer or a BIOS MBR computer.
Unless you are using an older Windows 7 computer, or a Chromebook computer, or a Coreboot computer, or the new Pinebook Pro laptop, the odds are your computer is using UEFI and GPT. All Windows 8, 9, 10 and 11 computers are UEFI computers. All recent Apple computers are UEFI. Knowing the type of firmware and partition table you have is important because it will affect the steps you should take to create your USB external drive. On a Windows computer, click on This PC icon in the desktop, then Manage, then Disks Management. On a Linux Mint computer, click on All Applications, Disks.
Step 6 Decide what type of External Drive you want to create
The remaining steps depends on what type of computer you have and what type of external drive you want to create. In this article, we will cover 2 cases:
Case #1: BIOS Host computer and BIOS Target USB Drive.
Case #2: BIOS or UEFI Host computer and UEFI Target USB Drive
The easiest process is to use a BIOS host computer to create a BIOS USB drive. The drawback of this option is that your USB Drive will not work on any newer Windows or Apple computer. This is because the drive will use a Master Boot Record Partition Table and newer Windows and Apply computers can not read such partition tables. The advantage is safety in that you do not need to worry about UEFI Boot Loader Hijacking – because BIOS computers do not use UEFI.
The second case is using a BIOS or UEFI host computer to create a UEFI USB drive. The drawback of this option is that your USB drive will not work on anything but a newer Windows or Apple computer (and it may not work on Apple). We will show you a simple way to avoid UEFI Boot Hijacking.
Here are the steps for each of these cases:
Case #1 BIOS Host computer and BIOS Target USB Drive.
Step 1 Set your laptop to boot from a USB drive
This is done by entering the BIOS of your laptop – typically pressing F2 immediately after pushing the Power On button. The BIOS is also where you might be able to change from UEFI boot to Legacy boot. The actual BIOS changing process will vary greatly from one model to the next. For more information about entering BIOS for your laptop, to a Search in any Search engine. Go to the Boot Sequence section of your BIOS and change it to start from a USB Drive instead of your computer’s internal hard drive. Then Save and Exit the BIOS.
Step 1.2 Start a Live Session on your computer
Connect your computer to the Internet with an Ethernet cable. Then use your non-persistent USB Live stick to start a Live Session. If your computer has USB 2 ports and USB 3 ports, the USB 2 ports are usually on the right. Put your non-persistent live stick on the right port so that later you can put your USB 3 external drive target in the left port. This will bring up the traditional Debian Installer screen.
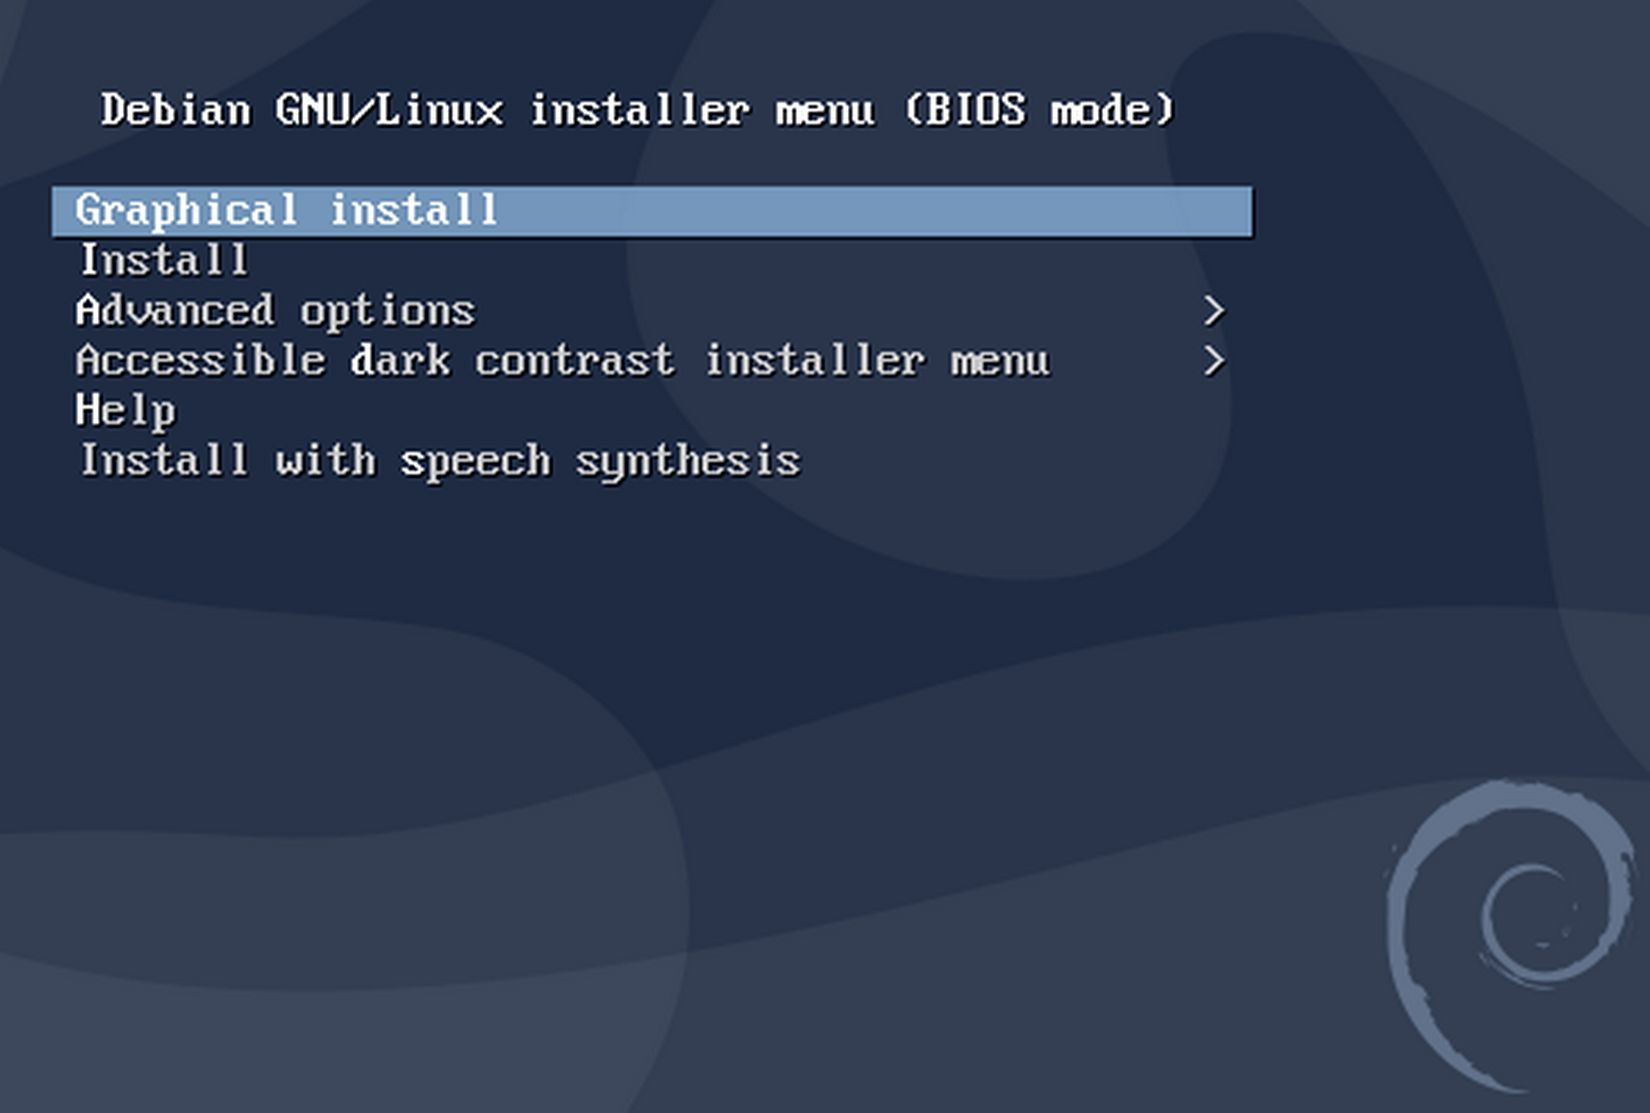
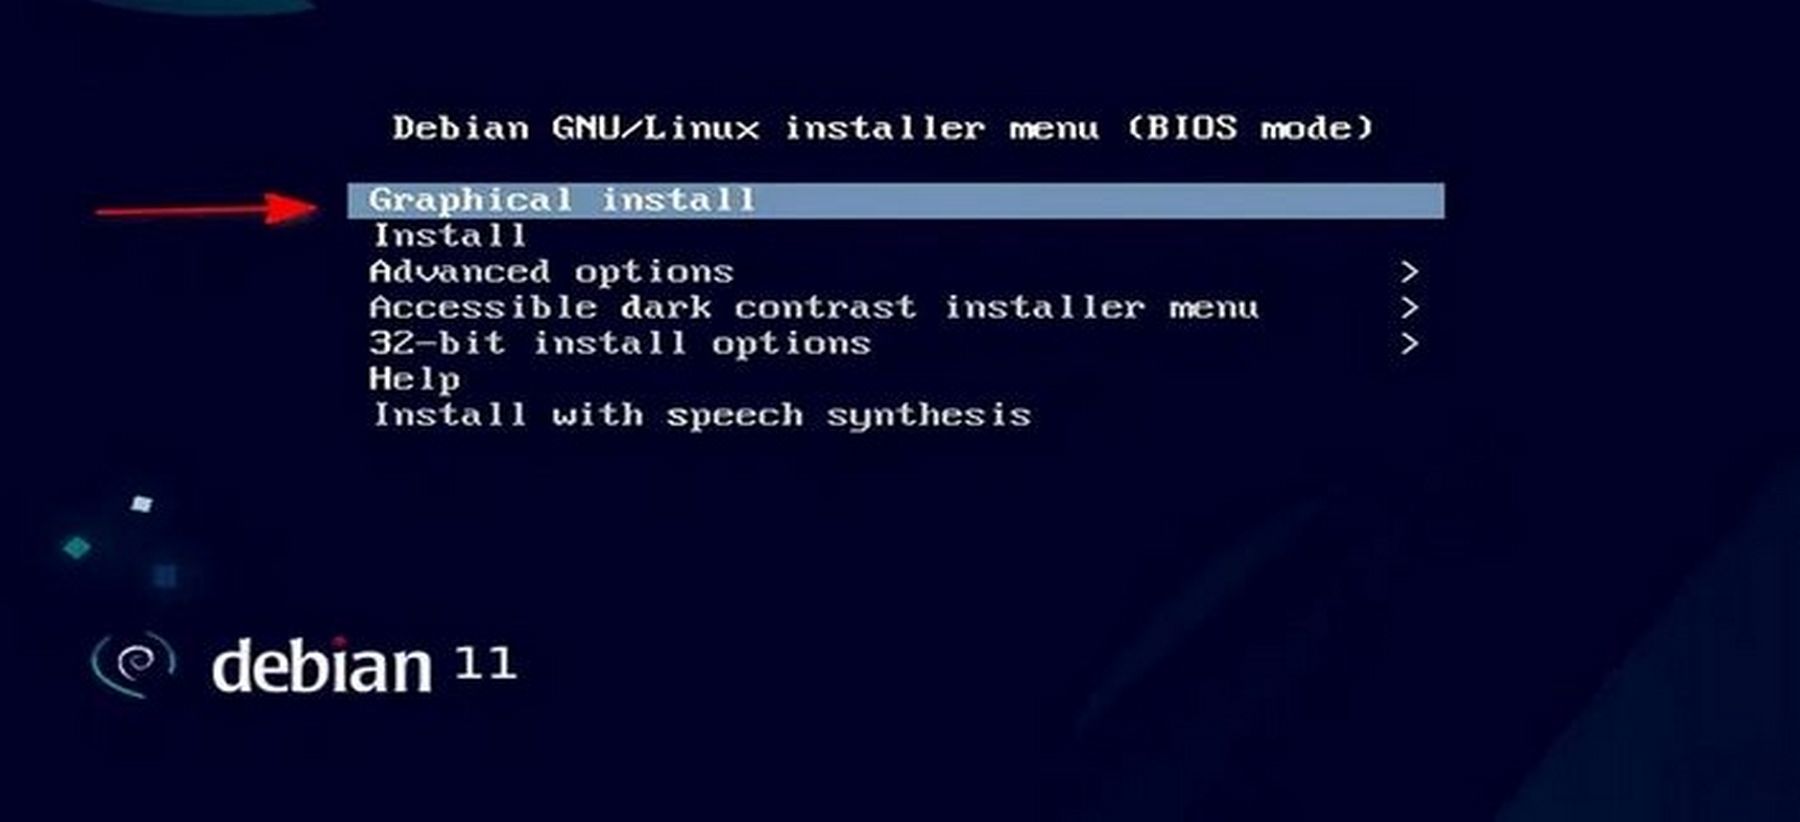
Step 1.3 Start the Debian Installer
Start the Debian Installer by double clicking on Graphical Install. Select language and keyboard; install third party software. Press Enter on your keyboard to get to the next screen where you can use your mouse again. Expand the bottom of the screen to see the Continue button. For Language, choose English. Then click Continue. For Location, choose US. Then Continue. For Keyboard, choose American English and click Continue. Debian 11 will then load.
Only after the installer starts, insert the already formatted USB 3 external drive you want to place persistence on into a USB port on the left side of your computer.
For Configure the Network, leave the host name at Debian. Then click Continue. For domain name, make up a pretend domain name like dev.test. Skip the root password we will add root later. Click Continue.
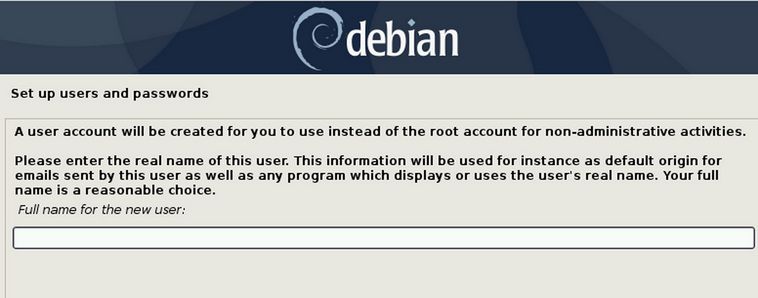
You can enter your own full name for the user account. However, you can also enter a name like debian. Then click Continue. On the next screen, enter a user name with lower case letters and no spaces. You can use the suggested username or replace it with whatever you want. Just remember it as you will need it later to log into your server. My screen choose debian. Click Continue. Enter your password twice. Note that this will also be the password for executing sudo commands. These are commands that run with root privileges. Choose a short password that you can easily remember. Then click Continue. Then select your time zone and click Continue. Next is the very important Partition Disks screen:
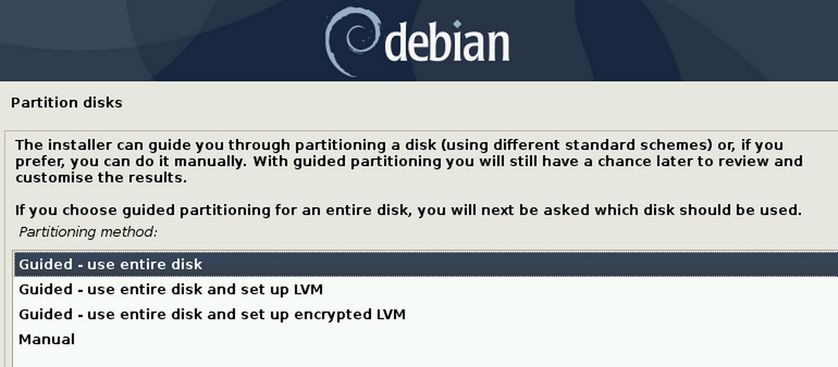
Use the default hard disk partition layout (Guided - use entire disk). This creates one EXT4 partition for storing all files and another partition for the swap. When your server consumed all available RAM it will place RAM data in the swap. Think of it as a low speed emergency RAM.
On the next screen, carefully select the USD drive rather than your host computer hard drive. Your host computer hard drive will be sda and your USB Installer drive will be USB. Therefore, your Target USB drive will be sdc. Also put everything on one partition.
Step 1.4 Installation Type Screen
Select “Erase entire disk and install Debian” Then click “Install now.” Do not worry that you have not been able to select the drive yet. That question is on the next screen which is called Erase Disc and Install Debian Use the drop down arrow to change the target from sda to sdc. Before the install actually occurs, you will see a screen that says only sdc will be reformatted.
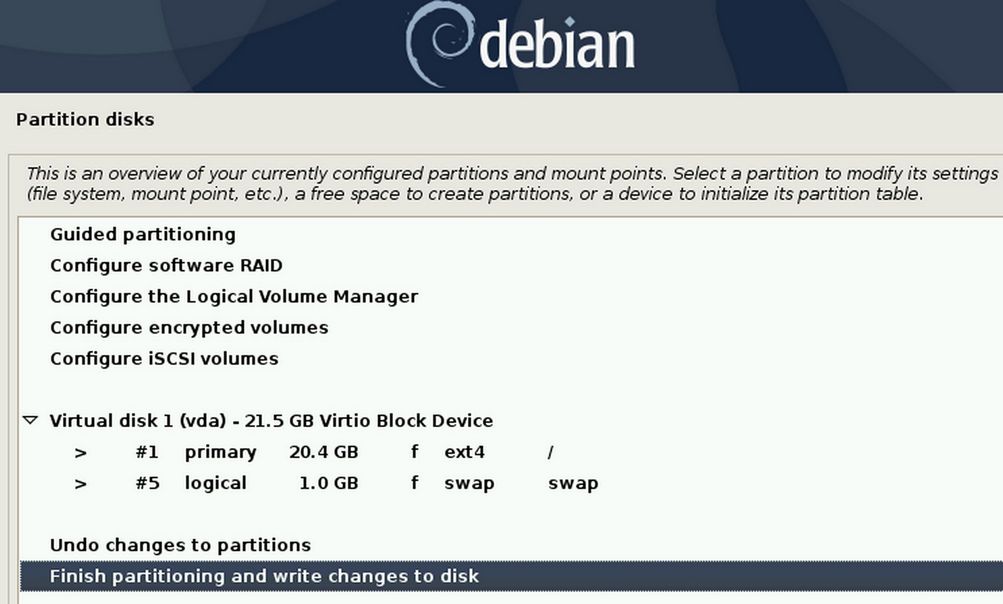
The next screen shows the Partition table. Just click Continue.
On the next screen, for Write the changes to the disk, change the select from No to Yes and click Continue. The base system will then be installed. The next screen will ask if you have additional discs you want to add. The correct answer is No. Then click Continue. Then choose the US Package Manager and click Continue. Then choose deb.debian.org. Then click Continue. Leave the next screen (Proxy Package Manager) blank and click Continue. For the popularity contest, leave it at no and click Continue.
Then on the next screen, uncheck the Debian Gnome Desktop environment and check the Cinnamon desktop and keep standard system utilities checked. Do not check the web server as we will install that later when we install our custom Control Panel. After checking this box, click Continue.
Step 1.5 Finish the Debian Installation
The installer will eventually ask you where you want to put the boot program. Check yes to the main drive and on the next screen, select the sdc drive.
Step 1.6 Shut down is better than Restart
Regardless of the type of external drive you are creating, once the install is complete, your will be asked to restart. Click restart and watch carefully. Once the screen goes blank, pull out both USB drives.
Step 1.7 Test your BIOS Computer on a Stick
After your computer has powered off, remove your external USB computer on a stick and re-insert it. Then Power On, press f2 to make use that your BIOS is set to boot from a USB and then press Save and Exit which will start the USB and open at the Debian Start screen. Make some changes and then shut down the session. Then remove and reinsert the external USB drive. Then start your computer to verify that all of the changes you made were saved. You should now be able to take your Persistent USB and use it to run any computer where the BIOS is set for Legacy Boot and is set to install from USB first.
Case #2: UEFI Host machine and UEFI Target USB Drive
Case #2 Step 1 Insert your Debian LIVE USB and press the Power On button. Then press F2 to reach the BIOS screen.
Set your laptop to boot from a USB drive and use UEFI without secure boot. Enter the BIOS of your laptop. Go to the Boot Sequence section of your BIOS and change it to start from a USB Drive instead of your computer’s internal hard drive. If available, also change it to boot from UEFI instead of BIOS. Also make sure secure boot is turned off. Then Save and Exit the BIOS. If using the debian live usb installer, there is no longer any need to unflag the SDA2 Partition Boot Flag. Debian now accurately places the boot flag on your target USB without affecting the boot of your host drive. It is important that the host laptop be connected to an Ethernet cable.
Step 2 Run the Debian Installer
At the Debian installer first screen, leave it as the default Graphical Install option. Press Enter on your keyboard to get to the next screen.
For Language, choose English. Then click Continue. For Location, choose US. Then Continue. For Keyboard, choose American English and click Continue.
The next screen is called Configure the Network. We are asked to enter a Hostname with the default option being the word debian.
The next screen is called Domain Name. Use the domain name example.com.
Skip the root password we may add a root user later. Click Continue.
Step 3 Insert a blank Target USB before typing in your Username and password. Insert the blank USB drive we will use for a Persistent Computer on a Stick. Enter your first name for the user account. Then click Continue. The next screen allows you to enter a user name which is shorter with lower case letters and no spaces. Use your first name. You will need this username later to log into your server. Click Continue. Enter your password twice.
Step 4 Partition Disks Screens
At the first Partition Disc screen, leave it set for Use the Entire Disk.

Then select the sdc removable drive. Then click Next. A Debian Installer screen called Partition Disks may ask Force UEFI Install?Click Yes.
At the next screen, choose Put everything in one partition. Click Continue. The next screen shows the Partition table. Just click Continue. On the next screen, for Write the changes to the disk, change the select from No to Yes. Note that only the sdc drive will be reformatted. SDA and SDB drives will not be affected. Click Continue.
The base system will then be installed. The next screen will ask if you want to use a package manager. Click Yes. Then click Continue. Then choose the US Package Manager and click Continue. Then choose deb.debian.org. Then click Continue. Leave the next screen (Proxy Package Manager) blank and click Continue. For the popularity contest, leave it at no and click Continue. The next screen is called Software Selection.
By default, the GNOME desktop is selected. Uncheck GNOME and check Cinnamon. Then click Continue.
Leave Install the Grub Boot loader set to Yes. Then click Continue. Then on the next screen, select the sdc drive as that is where Grub should be to start our computer. Then click Continue.
The next screen lets you know that your Debian installation is now complete. Click the Continue. Wait a few seconds for the screen to change back to black. Then when the screen is black, quickly pull the Debian Live USB stick out of the USB port. The computer will then start from the USB Target drive and bring up the password screen. Type in your username and password to reach the Debian start screen.
What’s Next?
In the next article, we will review some important First Steps for completing the initial configuration of Linux Debian.